Posts tonen met het label how to. Alle posts tonen

zondag 27 november 2016

Garduino-automated gardening system (full tutorial)


Picture of Garduino-Automated Gardening System

This instructable is a guide for setting up an automated gardening system using an arduino and other cheap electronic parts.  It allows sustainable gardening by using sensors to determine soil moisture, as well as a webscraper to determine future weather.  It uses this information to save water by only using the requisite amount.   Requirements for this project include experience soldering, some basic programming experience, and much patience for debugging.

See video for example of why we need this.

Step 1: Build-Moisture Sensors

The moisture sensors rely on the resistivity of water to determine the moisture level of the soil.  The sensors measure the resistance between two separate nails by sending a current through one of them and reading a corresponding voltage drop due to a known resistor value.  The more water the lower the resistance, and using this we can determine threshold values for moisture content.
We will use three such sensors and use a multiplexor to alternate reading between them without using more than one arduino analog port.
While we will include a circuit board diagram, we recommend building the circuits on a breadboard first which will allow for both understanding and debugging.
Each sensor uses two nails, a 100 ohm resistor, and a 100 K-ohm resistor.  We built a casing for each sensor with acrylic tubes, however this is not necessary.

Step 2: Build-Moisture Sensor- 1

The first step is to find two equal length nails of any type, although we found that longer and non-galvanized nails worked best (galvanized nails do not work at all).  Next, a wire needs to be soldered to each nail.  It is best to use weaved wire since it is  flexible and less likely to break during use.  The nails act as a heat sink, and to counteract this they must be heated before soldering.  A hotplate was used to get the nails very hot.
A word of caution, as the name implies the hot plate gets extremely hot, as will the nails, so please use pliers to remove the nails from the hotplate.
It is useful to shrink wrap the soldered parts of the nails, especially if you are not planning to make a probe structure.

Step 3: Build-Moisture Sensor-2

The next step is to wire the nails to the arduino.  Use the circuit diagram provided.  The sensor works by sending a fake AC current by alternating DC current between the two nails.  The analog voltage is then read and a moisture level can be inferred.  Our code for the whole project will be available.   A picture of the finished sensor with acrylic covering is on the next page.

We read an input voltage into a multiplexor from a voltage dividor created by the 100K resistor. The 100 Ohm resistor, attached to the other lead of the sensor, is used for current limiting. Current limiting imposes an upper limit on the current coming into the arduino, which protects it from short-circuiting.

Step 4: Build-Moisture Sensor-3 (optional)

Take a hollow acrylic tube and attach it to a pointed front with two holes for nails. Seal the bottom from water with silicone glue. Make sure that the nails are not touching as this will short the circuit.  Use a rubber stopper to seal the top.  It is important that the nails be equal distances apart on each of the moisture sensors, as any variation could affect resistivity readings from one or more of the probes. 

Step 5: Build-Moisture Sensor-4

To improve performance we used three soil moisture sensors.  However, there may not be enough analog pins on the arduino to accommodate all of these depending on what other attachments you are using.  We solved this problem by using a multiplexer, which allowed us to switch between and read from each of the three pairs of sensors. The circuit diagram is given below.

Step 6: Build-Temperature Sensor -1

For the temperature sensor we used a TC-74 chip.  The wiring here is pretty simple and is shown below.  It is recommended that you use 1K resistors on the ports connecting to the arduino (SDA, SCLK).  The sensor works by exposure of the chip's metal tab. Attaching this metal tab to a piece of sheet metal will increase the sensor's sensitivity over a wider area and improve performance.

Temperature readings are used to normalize soil moisture content readings, since higher temperatures will increase resistivity between the nails, potentially giving inaccurate readings. It is important to correct for temperature so the arduino will trigger watering at the appropriate time. 

Step 7: Build-Circuit Board

Make a circuit board.  The schematic is shown below and the board file is attached.  We used the program EAGLE to design the board, and the files are in that format.

Step 8: Build-Pump System-Relay

The pump system we created uses a small fountain pump attached to the arduino with a solid state relay, allowing the arduino to turn the pump on or off automatically.  Strip off a segment of the pump's insulating tubing, and cut only one of the inner wires in half.  Attach each end of the newly cut wire to the relay's two outputs.  Be careful to avoid touching any exposed metal on the relay, as it is at a high voltage. We recommend putting electrical tape over the exposed wires.  Finally, connect the relay's ground to the the arduino's ground and the relay's input to an arduino digital pin (in our case 5). 

Step 9: Build-Pump System-Reservoir

The submerged pump needs a constant amount water to function properly.  To automate this process we used a float valve that attaches to a hose and opens when water is needed and closes when the water level rises.  Make sure to drill the hole high enough to give the float valve room, and that the tank is wide enough to accommodate the float.

Step 10: Build-Pump System-Tubing

Drill small holes through a length of plastic tubing that is the correct size for the pump.  Then cut pvc pipe into 5-8 inch segments, punch small holes through their centers, and thread the plastic tubing through the holes.  These will be staked in the earth and provide a stable base for the tubing.  One may want to put a point on the bottom of the small pvc pipes so they are easier to stake.  There are many other ways to build the sprinkler system, so check out your local hardware store for some inspiration.

Step 11: Connect

When connected, the circuit should look like this.  Note: this picture includes a wifly shield that will hopefully be implemented in the future.  Notice that we connected the relay to the wifly shield.  It would be better to put this on the board, however, this was an oversight on our part. 

Step 12: Build-Plastic Enclosure (optional)

We then used a regular plastic box 15x10x6 cm to enclose the circuit board and a separate box to enclose the relay.  The arduino and relay need to be protected from the elements if they are to be placed outside in a garden. This separation allows the relay to get very hot but not damage the circuit board, however, it should not get very hot if using the code provided at the end.

Step 13: Code

The garduino uses arduino and python programs that interact with one another through the library pySerial. The arduino checks the soil moisture content and if low, triggers the python web scraper and find tomorrow's weather forecast.  If the forecast includes rain, python tells the arduino to delay checking soil moisture content for the next 24 hours.  If the forcast is dry then the arduino will be triggered to water.  After this, the system will recheck soil moisture content every twenty minutes to see if more water is needed.  if water is not needed at the initial watering check, or after a recheck, the system waits for 24 hours and the process is repeated.

For the scraper to work, you need to download and install:
- BeautifulSoup
- urllib2
- pySerial

I would recommended creating a github account (https://github.com/) and pulling everything from github.

We used yahoo's weather api to find tomorrow's forecast: http://developer.yahoo.com/weather/

Look here for some good documentation:
- http://www.crummy.com/software/BeautifulSoup/ (Beautiful Soup documentation)
- http://www.regular-expressions.info/ (Regular Expressions, useful for parsing html)
- http://www.linuxforu.com/2012/03/building-image-processing-embedded-systems-using-python-part-3/ (best example of pySerial I found...much better than pySerial's documentation)
- http://www.akeric.com/blog/?p=1140 (another good example of pySerial)

Thanks to Joseph Long for help with the code.

Step 14: Garduino in Action


Step 15: Further Improvements

Further improvements include implementing the wifly shield as well as doing a better calibration of the moisture sensors.  The value that we have for the necessary moisture content to water is estimated and a more careful analysis would help conserve even more water. We would also like to plot real-time data from our garduino using matplotlib and ipython.

How to make Garduino-Automated Gardening System [Full Tutorial]


How to make Garduino-Automated Gardening System


Check the full tutorial here:
http://goo.gl/CxNyRy

zaterdag 5 november 2016

hoe maak ik een wormen composter


http://www.ecodorpbrabant.nl/html/wat-willen-wij/ontwerp/permacultuur/Z0-Wormenbak.php


Permacultuurtip-Wormenbak

wormenEen wormenbak is een ideale methode om keukenafval te recyclen tot een rijke donkere, naar bosgrond ruikende grond of bodemverbeteraar. Het grote voordeel van wormencompost is dat men hem zowel binnen- als buitenshuis kan maken. Zo kunnen ook mensen die op een appartement wonen hun groente- en fruitafval composteren.

Een wormenbak is te koop, bijvoorbeeld via de site http://www.wormery.nl/wormenbakken.phpvoor een prijs van circa € 70,-. Je kunt een wormenbak echter ook zelf maken. Hieronder een handleiding.

Een wormenbak maken

Een makkelijke methode is het stapelen van twee emmers of plastic bakken in elkaar. De onderste bak laat je zoals hij is, maar de bovenste bak moet in de bodem gaten hebben. Maak deze gaatjes met een zo klein mogelijk boortje, zodat de wormen er niet door kunnen vallen. Er moet ruimte zitten tussen de twee bodems voor de opvang van vocht. Dit kun je bewerkstelligen door er bijvoorbeeld een steen tussen te leggen.

Een wormenbak opstarten

Voor een wormenbak heb je mestwormen nodig, ofwel de 'Eisenia Foetida'. Dit zijn rode wormen die met name van compost leven. Je vindt ze in oude paardenmest of als aas bij je lokale vishandel. De gewone regenworm is niet geschikt als compostworm. Je hebt ongeveer een halve kilo nodig om je wormenbak op te starten. Binnen enkele weken heb je al tientallen kinderwormpjes.

In de bovenste bak maak je een voedingsbodem aan voor je wormen. Begin met stro, gescheurde kranten en wat aarde, en bouw dit verder op met organisch afval en papier. Zorg dat het geheel vochtig is, maar zeker niet te nat. De meest voorkomende reden voor het mislukken van een wormenbak is te veel vocht. Daar krijg je ook vliegjes van. Je wilt de vochtigheid van een uitgeknepen spons benaderen.

Bovenop je voedingsbodem plaats je de compostwormen en de eerste laag groente- en fruitafval (in niet te grote stukken). De binnenemmer hoeft niet per se afgedekt te worden, maar het is verstandig om een ietwat vochtig krantje op de compost te leggen. Wormen houden niet van licht en zullen ervoor kiezen bedekt te blijven. (Een goede manier om je wormen de grond in te krijgen als je ze in de bak introduceert, is door er een lamp boven te hangen). De wormen hebben nu enkele weken de kans om zich te nestelen en aan te passen aan hun nieuwe omgeving. Je controleert enkel of de wormen actief blijven en overal verspreid zitten. Het keukenafval ondergaat in die periode een eerste aanval van bacteriën in de wormenbak. Na een drietal weken, wanneer de wormen het materiaal beginnen te verwerken, kan je stilaan beginnen met voederen en het systeem op dreef laten komen.

Voedsel voor de wormen

Een worm moet wachten tot de bacteriën en schimmels het voedsel mals hebben gemaakt zodat hij het kan opzuigen. Zijn menu bestaat dan ook hoofdzakelijk uit vochtmateriaal. Verklein grote stukken tot stukken van enkele centimeters. Geef de wormen niet te veel scherp of zuur voedsel. Voeg pepers, uien en citrusvruchten slechts in kleine mate toe. Al het andere - niet te harde - plantaardige keukenafval komt in aanmerking, liefst zo klein mogelijk. Zorg er wel voor dat de bak niet te nat wordt. Voeg zo nodig krantsnippers of wat zaagsel toe.
WEL
NIET
schillen van groenten en fruit
koffiedik met papieren filter
kleine hoeveelheden etensresten (niet in vet gebakken)
verwelkte bloemen
snippers papier en karton
grasmaaisel
harde takken
harde stukken kool of ananas
onkruid
vlees en vis
In de onderste bak zal vocht terecht komen dat erg waardevol is voor je planten. Dit is het percolaat en wordt soms 'wormenthee' of 'wormen-likeur' genoemd. Haal het percolaat er regelmatig uit, verdun het met water (verhouding: 10% percolaat en 90% water) en geef het aan je tuin. Het is ook schitterend als voedsel voor kamer- en balkonplanten.

Een wormenbak hoort niet te stinken en geen vliegjes te bevatten. Veel mensen hebben hem in een keukenkastje, gangkast of onder de trap staan. Je kunt hem ook buiten plaatsen, maar dan moet je hem in de winter wel tegen de kou beschermen.

De wormenbak onderhouden

Een worm heeft een licht vochtige omgeving nodig waar toch nog zuurstof is om te leven. Zorg er dus voor dat de wormen niet verstikken. Je mag ook niet te veel in de wormenbak roeren. Wormen hebben het graag rustig. Af en toe eens kijken of er nog wormen in de bak zijn, kan geen kwaad. Het kan zijn dat je de wormenbak een 2-tal keer per jaar moet leegmaken om het verteerde materiaal te verwijderen en de bak opnieuw op te starten.
Het grootste probleem doet zich voor met teveel vocht, doordat het fruit zo'n hoog vochtgehalte heeft. Gooi er daarom regelmatig snippers van papier of karton in, dat is goed voor het vochtgehalte en de wormen hebben dat nodig om voldoende vezels binnen te krijgen.

De wormenbak uitbreiden

Een systeem zoals hierboven beschreven kan makkelijk worden uitgebreid door te stapelen: als de bak voor zo'n 3/4e deel vol is, kan er een tweede bak op worden gezet. Maak in de bodem van deze tweede bak grotere gaten dan in de bodem van de eerste. De wormen moeten hier juist wél door kunnen kruipen. Als de voeding in de onderste bak op is, zullen de wormen naar boven migreren en daar gezellig doorgaan met composteren. Zo kun je heel makkelijk je eerste bak oogsten zonder daar te veel wormen uit te hoeven verwijderen.

Een variant op de wormenbak

Een goeie variatie op een wormenbak is de wormenbuis. Neem een pvc buis van zo'n 40-50 cm lang met een grote diameter en maak gaten in de onderste helft. Graaf de buis grotendeels in en vul hem zoals je een wormenbak vult. De creepy crawlers zullen zich tegoed doen aan je afval en dit vervolgens tijdens hun uitstapjes in je tuin deponeren als waardevolle compost. Omdat mestwormen specifiek voedsel nodig hebben, zullen ze trouw terugkeren naar je buis om te eten.

Veel succes met jullie wormenbakken!

Op youtube staat een filmpje waarin wordt uitgelegd hoe je een wormenbak maakt. Zie: http://www.youtube.com/watch?v=WxhEQEA0GN8.

maandag 28 maart 2016

Ten Futuristic Garden Tools

Ten Futuristic Garden Tools

June 10, 2013 by
Bitponics_614_urbangardensweb
A slew of high-tech weapons could soon occupy home gardeners’ arsenals. From soil humidity sensors, to computer-generated growing tips, to weather detection devices, these contraptions challenge the notion that plants need a human touch.
Whether you’ve mastered indoor herbs, wrestled with roses to no avail, or painstakingly crafted a backyard flower patch, the new generation of garden gadgets could make your life easier. Here are ten of the most intriguing new techie tools for green and black thumbs alike:  

1. Bitponics
Bitponics-laptop
You’ve heard of the Cloud, that ambiguous storage space for all the world’s data; Bitponics provides a similar service for gardeners through a cloud connected to your WiFi network. At $500, the Bitponics Base Station is a splurge, but it does provide a remarkable service: monitoring plant pH, water and air temperature, light and humidity. The system alerts you should anything skew too far from the plant’s personalized Grow Plan, and you can make adjustments through your computer, anywhere and anytime.

2. PlantLink
plant-linl-planter-device-urbangardensweb

Like Bitponics, this garden gadget relies on data stored in a cloud. Place the PlantLink in the soil near your indoor or outdoor plants – each plant or lawn area needs its own link – and enter the plant type into the company website.
plant-link-eplant-614_urbangardensweb
You’ll then be provided with a watering schedule, which you can access online and be alerted to via email. PlantLink is a Kickstarter project, developed by a group of University of Illinois engineering students.

3. Botanicalls 
Botanicalls_614_urbangardensweb
Although the assemblage of Botanicalls would appear to require an inhuman amount of patience and attention to detail–prepare yourself for soldering and wire-snipping–the end result is a device that allows your plant to tweet and text its needs.
botanicalls-with-phone-urbangardensweb
This project began in 2009 when students in the Interactive Telecommunications program at NYU wanted to give neglected plants a voice, and hesitant gardeners a leg up.

4. Indoor Garden Herb:ie
herb_ie-white-black
Using a combination of hydroponics and intensive energy-efficient lighting, Indoor Garden Herbie gives apartment dwellers the gift of a garden. This compact container comes in black, white, red or green, and would make an attractive addition to a kitchen or fire escape.

5. Click n’ Grow Smart Garden
ClickandGrow_614_urbangardensweb
Almost eerily prescient, Click n’ Grow is always one step ahead of you. The sleek flowerpot has a refillable water reservoir and plant cartridge filled with seeds and special growth medium–a super-vitamin for soil. Tucked inside the pot are electronic sensors and software that measures the plant’s needs, releasing precise amounts of fertilizer, air and water.

6. Erbiza
erbizia_614_urbangardensweb
There is more to this unassuming herb box than meets the eye. Constructed from PEFC-certified spruce wood, Erbiza brims with organic potting soil and seeds, and comes with a special code that enables registration on GrowThePlanet.com. The site doles out daily advice to ensure your chives, thyme, oregano and parsley flourish.

7. Windowfarms Tower 
windowfarms-urbangardensweb_614
Grow a vertical indoor garden beside a window year-round with this automated plant feeding and watering system. Windowfarms Tower supplies plants with nutrient-rich water that spurts upward from a reservoir in the system’s base, before funneling down from plant to plant. Thanks to a simple electric timer, the system is energy efficient; once installed, it will only cost a few dollars per year.

8. Rugiada Plant Sensor
Rugiada_614_urbangardensweb
The Italian trio of Lorenzo De Bartolomeis, Gabriele Diamanti and Filipo Poli combined their backgrounds in building, landscape and graphic design to create this multitasking irrigation device. It determines the amount of water your garden needs, based on air and soil humidity measurements, and type and quantity of vegetable. Rugiada also releases water in three different ways, depending on plant needs: nebulizing spray, drip or rotating sprinkler. Keep an eye out for Parrot Flower Power, a similar irrigation device with a wireless sensor, which is set for release some time this year.
9. Sprout Robot
sprout-robot-screenshot-urbangardensweb
This website answers the question on every new gardener’s lips: where do I begin? Simply input your zip code, and Sprout Robot will craft an easy-to-follow gardening plan based on your location and climate. Get seeds in the mail just in time for planting season, or opt to receive seasonal reminder emails to keep your garden on track.
10. Pocket Garden App
pocket-garden-app-urbangardensweb
For just 99 cents, this mobile growing guide covers an impressive range of gardening questions and concerns. From seed type, to germination and harvest time, to general planting suggestions, such as soil depth and plant spacing, Garden App is an uncomplicated yet thoroughly helpful resource.

On the Horizon
In development by Public Lab, an open community-supported non-profit, Infragram is a relatively simple and inexpensive (should retail for about $35) infrared camera which can measure plant health.
infragram-pant-camera-sensor-urbangardensweb
Currently in the crowdfunding stage on Kickstarter, Infragram is based on the principle that photosynthesizing plants absorb most visible light (less green than red and blue, which is why they appear green to us) but reflect near-infrared. Snapping a photo with Infragram results in two separate images–one with infrared, another with regular light–and a “false-color” composite where bright spots indicate lots of photosynthesis.
 

Category: Container Gardening, Containers and Pots, Finding, Garden Design, Garden Software, Great Finds, Green Gadgets, Herb Gardens, Hydroponics, Indoor Gardening, Irrigation, Urban Agriculture, Vertical Gardens, Window Boxes
Tags: , , , , , , , ,
Enjoyed this post? Subscribe to Urban Gardens!

zaterdag 5 september 2015

kunststof ondergrond


pvc is niet erg umweltfreundlich
dioxine?


try EPDM
http://www.conservationtechnology.com/pond_liner_rubber.html

RUBBER POND LINERS 

Pond liners made from synthetic rubbers are significantly more flexible and durable than liners made from plastics such as polyvinyl chloride (PVC), high-density polyethylene (HDPE), Polypropylene (PP), or thermoplastic polyolefin (TPO). Understanding the important differences between pond-grade rubbers and roofing rubbers and deciding what type of pond-grade rubber is best for each project requires a rudimentary understanding of how synthetic rubbers are made and how they differ.
SYNTHETIC RUBBER: A synthetic rubber is made by mixing one or more rubber polymers– the chemical backbones of rubbers responsible for their distinctive elastic properties– together with oils, carbon-black, sulfur, and other substances that provide the desired color, flexibility, strength, and hardness. This mixture passes between massive steel rollers which squeeze it into a thin sheet of uncured rubber. Since uncured rubber is very sticky, it must either be dusted with mineral talc (talc-process) or layered between sheets of fabric (talc-free process) so that it can be rolled up without sticking to itself and fusing into one solid mass. The roll is then baked in an oven until it chemically cures into the elastic substance we normally think of as rubber.
EPDM RUBBER: EPDM is the name given to the class of synthetic rubbers made primarily from EPDM polymer, shorthand for Ethylene Propylene Diene Monomer. Although there are hundreds of ways to formulate EPDM rubber from EPDM polymer, all share a chemical structure that gives them extraordinary resistance to heat, cold, sunlight, and air pollution. EPDM has been primarily used for waterproofing in exposed environments where long-term weatherability is essential, such as for waterproofing large flat roofs on commercial buildings. Since an EPDM rubber sheet can be formulated by combining as little as 30% of EPDM polymer with 70% of oils and fillers, it is relatively inexpensive to manufacture. As a consequence, EPDM rubbers are among the lowest priced of all synthetic rubbers.
EPDM RUBBER POND LINERS: The characteristics of an EPDM rubber sheet is determined both by the particular EPDM compound (mixture of ingredients) selected. Since any rubber made primarily of EPDM polymer can be called EPDM rubber, there are many types of EPDM and simply purchasing an EPDM sheet for use as a pond liner can be risky in the absence of information about the other ingredients which make up the majority of the formula. For example, certain curing compounds, fire-retardants, and fillers commonly used in EPDM roofing sheets rubber can be toxic to aquatic life. Pond-grade EPDM rubbers must be specially formulated and tested to be safe for plants, fish, and other aquatic life. We offer two pond-grade EPDM sheets: Pond EPDM and Conservation Technology EPDM, both of which have a long track record of safe use for pond lining.
POND LINER THICKNESS: Thickness of synthetic rubbers is expressed in mils: one mil equals one-thousandth of an inch or one-fortieth of a millimeter. In general, the thickness of rubber has little effect on environmental aging characteristics of a liner, but can have a significant effect on the ease of installation and resistance to mechanical abuse. Irregular free-form garden ponds, especially those smaller than 500 square feet, should be lined with 30 mil (0.75mm) rubber for the neatest results with the fewest folds. Larger free-form ponds, or small ponds with simple rectangular or elliptical shapes, can be successfully lined with 40 mil (1.0mm) or 45 mil (1.15 mm) rubber. Recreational ponds, stormwater ponds, irrigation reservoirs, canals, artificial wetlands, and other large projects are usually lined with 60 mil (1.5mm) rubber since it is easier to seam and is considerably stronger than thinner sheets. 60 mil sheet is also preferred for waterfalls and streams.
POND EPDM: Pond EPDM is our most popular and affordable EPDM rubber pond liner. It is manufactured with the talc process (see above) which leaves a mineral talc residue that gives it a slightly shiny surface: sheet color can vary from dark black to charcoal gray, depending on the amount of talc present. White streaks of talc may be present, but will usually disappear with time. Standard sizes in 45 mil thickness follow. Sizes shown in plain type are stock sizes that generally ship within 24 hours. Sizes in italics are not stock sizes and may involve shipping delays.
5 x 5
5 x 1010 x 10
5 x 1510 x 1515 x 15
5 x 2010 x 2015 x 2020 x 20
5 x 2510 x 2515 x 2520 x 2525 x 25
5 x 3010 x 3015 x 3020 x 3025 x 3030 x 30
5 x 3510 x 3515 x 3520 x 3525 x 3530 x 35
5 x 4010 x 4015 x 4020 x 4025 x 4030 x 40
5 x 5010 x 5015 x 5020 x 5025 x 5030 x 5035 x 5040 x 5050 x 50
5 x 10010 x 10015 x 10020 x 10025 x 10030 x 10035 x 10040 x 10050 x 100
5 x 15010 x 15015 x 15020 x 15025 x 15030 x 15035 x 15040 x 15050 x 150
5 x 20010 x 20015 x 20020 x 20025 x 20030 x 20035 x 20040 x 20050 x 200
For large water features and lakes we can generally supply the following non-stock roll sizes in 60 mil thickness:
10 x 10020 x 10030 x 10040 x 10050 x 100

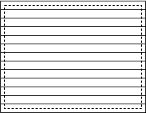
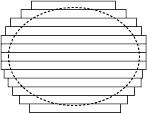
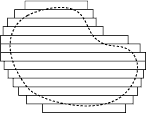
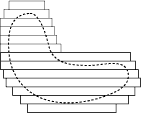
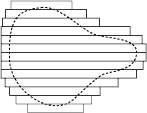
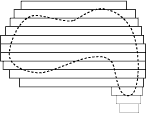
CONSERVATION TECHNOLOGY EPDM: Conservation Technology EPDM Rubber is our highest quality EPDM pond liner. Its superior performance makes it the liner of choice for projects that demand the very best liner available. It is manufactured with the talc-free process (see above) that yields a clean, slightly textured black surface. We custom-fabricate 30 mil, 40 mil, and 60 mil sheets to order, so there are no standard sizes. In addition to simple rectangles, we can make almost any shape that can be drawn as a series of 5'6" strips of rubber (with certain length limitations), such as the following shapes:
rectangle
rectangle
ellipse
ellipse
kidney
kidney
crescent
crescent
pear
pear
free form
freeform

CUSTOM THREE-DIMENSIONAL LINERS: Where folds are not acceptable, such as for formal reflecting ponds, we can fabricate three-dimensional rectangular liners with vulcanized corners in Conservation Technology EPDM Rubber. We can also fabricate three-dimensional L-shapes and cylinders, but these can be very expensive and may require long lead times. The walls of the pond must be accurately formed of wood, masonry, or concrete: three-dimensional liners cannot be used with soil or rustic stone walls. The liner can be fastened to the walls with our black metal termination bars and termination bar tapes, or it can be wrapped over the top as shown.
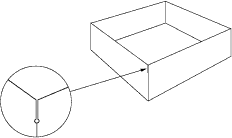
box with slit corners
If the liner is to be wrapped over the top of the pond walls,
size the liner at least four inches taller than the pond.
Position the liner in place, and fill it partially with water.
Cut a small round hole at each corner of the pond walls
and slit the corners to make four side flaps.

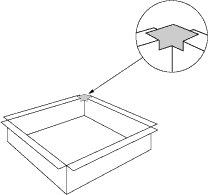
box with taped corners
The open corners of the flaps can be sealed with a small square
of uncured repair tape. After the rubber is cleaned, the tape
is positioned so that it hangs over the pond approximately two inches.
Since the tape is stretchable, it can be formed into the corner.

FIELD SEAMS AND REPAIRS: Whenever possible, a pond should always be lined with a single sheet of rubber. Since sizes up to 50 ft x 200 ft are standard in Pond EPDM and even larger sizes are possible in Conservation Technology EPDM, field seaming in residential-scale work is usually limited to joining a stream or waterfall to a pond.
Larger projects such as recreational ponds and reservoirs will require field seaming several large sheets with a two-step process utilizing our self-adhesive seam tapes and laminates that are cold-applied without specialized equipment (see Seams). Note that we do not recommend the use of contact adhesives commonly used for rubber roofing, since these adhesives are too weak and have insufficient resistance to ponded water to be reliable for seaming pond liners. When we supply liners for a project requiring field seaming, our technical staff reviews all the details to make certain that the project can be successfully completed.
Holes can be permanently patched with our self-adhesive repair laminates; stream and waterfall liners can be easily joined to pond liners with our self-adhesive seam tapes (seeRepairs).
LIFETIME: Pond EPDM and Conservation Technology EPDM liners are warranted for twenty years, subject to certain limitations (request written warranty for details). Extensive field experience suggests that they will last longer than twenty years in severe above-ground environments and perhaps longer than fifty years in protected underwater or underground environments.
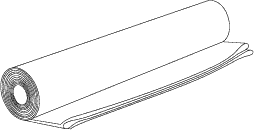
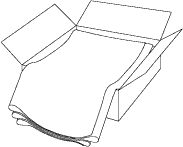
PACKING AND HANDLING: Pond EPDM liners 50 feet and longer are supplied accordion-folded and rolled; shorter liners are supplied accordion-folded and boxed. Stock 40 mil rolls are shipped on 7 foot cardboard cores; non-stock 40 mil rolls and 60 mil rolls are shipped on 11 ft long cardboard cores. All Pond EPDM liners are supplied boxed, accordion-folded in both directions. Both types of EPDM rubber weigh approximately 0.2 pounds per square foot in 30 mil thickness, 0.3 pounds per square foot in 40 mil or 45 mil thickness, and 0.4 pounds per square foot in 60 mil thickness.
rolled liner
Pond EPDM 50 ft and longer
is supplied accordion-folded in rolls.

All other liners are supplied
accordion-folded in boxes.
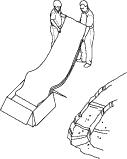
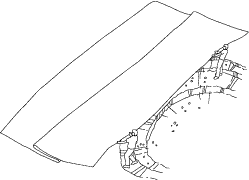
When ordering a large liner, be prepared to get the roll or box off the delivery truck and get it to the site since the delivery company will not do this for you. Position the roll or box at one corner of the pond, either on the surrounding land or within the pond. Carefully remove the roll wrapper or open the box to see how the rubber is folded and then orient the roll or box in the proper direction. After checking the site to make certain there are no sharp objects that could snag the liner, unroll or unfold the liner into a long strip beside or into the pond and then pull the liner across the pond, flapping it slightly to force air under the liner to help it float into place.

Unfold or unroll the liner,
making a long strip beside
or within the pond.

Then pull the liner across the pond,
flapping it slightly to force air under
the liner to help it float into place

PRICING:
Pond EPDM Rubber Liners
45 mil Pond EPDM Liner, 5 ft x 5 ft - $18.00
45 mil Pond EPDM Liner, 5 ft x 10 ft - $36.00
45 mil Pond EPDM Liner, 5 ft x 15 ft - $54.00
45 mil Pond EPDM Liner, 5 ft x 20 ft - $72.00
45 mil Pond EPDM Liner, 5 ft x 25 ft - $90.00
45 mil Pond EPDM Liner, 5 ft x 30 ft - $108.00
45 mil Pond EPDM Liner, 5 ft x 35 ft - $126.00
45 mil Pond EPDM Liner, 5 ft x 40 ft - $144.00
45 mil Pond EPDM Liner, 5 ft x 45 ft - $162.00
45 mil Pond EPDM Liner, 5 ft x 50 ft - $180.00
45 mil Pond EPDM Liner, 5 ft x 100 ft - $360.00
45 mil Pond EPDM Liner, 10 ft x 10 ft - $72.00
45 mil Pond EPDM Liner, 10 ft x 15 ft - $108.00
45 mil Pond EPDM Liner, 10 ft x 20 ft - $144.00
45 mil Pond EPDM Liner, 10 ft x 25 ft - $180.00
45 mil Pond EPDM Liner, 10 ft x 30 ft - $216.00
45 mil Pond EPDM Liner, 10 ft x 35 ft - $252.00
45 mil Pond EPDM Liner, 10 ft x 40 ft - $288.00
45 mil Pond EPDM Liner, 10 ft x 45 ft - $324.00
45 mil Pond EPDM Liner, 10 ft x 50 ft - $360.00
45 mil Pond EPDM Liner, 10 ft x 100 ft - $720.00
45 mil Pond EPDM Liner, 15 ft x 15 ft - $162.00
45 mil Pond EPDM Liner, 15 ft x 20 ft - $216.00
45 mil Pond EPDM Liner, 15 ft x 25 ft - $270.00
45 mil Pond EPDM Liner, 15 ft x 30 ft - $324.00
45 mil Pond EPDM Liner, 15 ft x 35 ft - $378.00
45 mil Pond EPDM Liner, 15 ft x 40 ft - $432.00
45 mil Pond EPDM Liner, 15 ft x 45 ft - $486.00
45 mil Pond EPDM Liner, 15 ft x 50 ft - $540.00
45 mil Pond EPDM Liner, 15 ft x 100 ft - $1080.00
45 mil Pond EPDM Liner, 20 ft x 20 ft - $288.00
45 mil Pond EPDM Liner, 20 ft x 25 ft - $360.00
45 mil Pond EPDM Liner, 20 ft x 30 ft - $432.00
45 mil Pond EPDM Liner, 20 ft x 35 ft - $504.00
45 mil Pond EPDM Liner, 20 ft x 40 ft - $576.00
45 mil Pond EPDM Liner, 20 ft x 45 ft - $648.00
45 mil Pond EPDM Liner, 20 ft x 50 ft - $720.00
45 mil Pond EPDM Liner, 20 ft x 50 ft - $1440.00
45 mil Pond EPDM Liner, 25 ft x 25 ft - $450.00
45 mil Pond EPDM Liner, 25 ft x 30 ft - $540.00
45 mil Pond EPDM Liner, 25 ft x 35 ft - $630.00
45 mil Pond EPDM Liner, 25 ft x 40 ft - $720.00
45 mil Pond EPDM Liner, 25 ft x 45 ft - $810.00
45 mil Pond EPDM Liner, 25 ft x 50 ft - $900.00
45 mil Pond EPDM Liner, 30 ft x 30 ft - $648.00
45 mil Pond EPDM Liner, 30 ft x 35 ft - $756.00
45 mil Pond EPDM Liner, 30 ft x 40 ft - $864.00
45 mil Pond EPDM Liner, 30 ft x 45 ft - $972.00
45 mil Pond EPDM Liner, 30 ft x 50 ft - $1080.00
other sizes in 45 mil or 60 mil - $call
Conservation Technology Rubber Liners
30 mil Conservation Technology Pond Liner, 5.5 ft x 82 ft - $call
30 mil Conservation Technology Pond Liner, 5.5 ft wide, per foot - $call
40 mil Conservation Technology Pond Liner, 5.5 ft x 82 ft - $call
40 mil Conservation Technology Pond Liner, 5.5 ft wide, per foot - $call
60 mil Conservation Technology Pond Liner, 5.5 ft x 82 ft - $call
60 mil Conservation Technology Pond Liner, 5.5 ft wide, per foot - $call
pre-fabricated sizes in 30 mil, 40 mil, or 60 mil - $call