woensdag 16 september 2015
EPDM platen
http://www.rubbermagazijn.nl/collectie/rubber-matten/rubberplaat/2013_zwart_rubberplaat-9mm-plaat-100x100cm.html
EPDM rubber platen als ondergrond
http://www.rubbermagazijn.nl/collectie/rubber-matten/rubberplaat/2013_zwart_rubberplaat-9mm-plaat-100x100cm.html
zaterdag 5 september 2015
Kinglake Vertical Garden
http://lushe.com.au/regeneration-wall/
Kinglake Vertical Garden
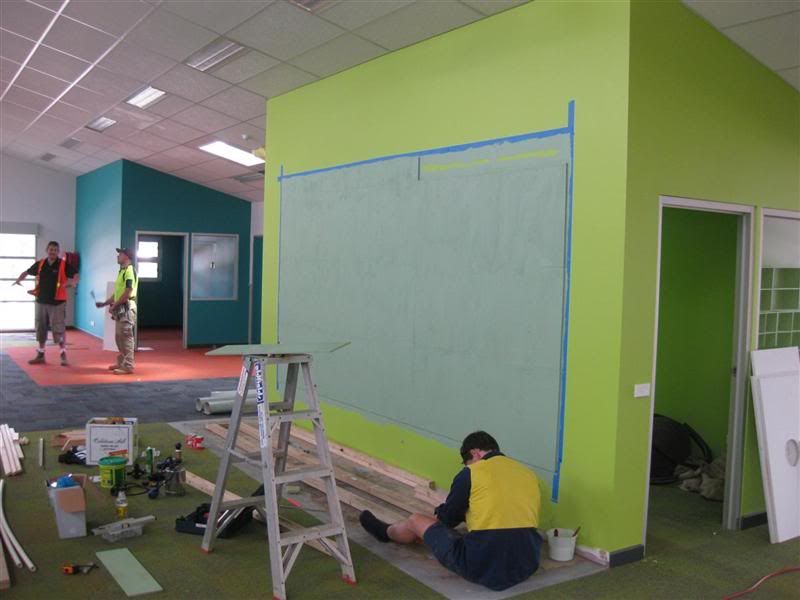
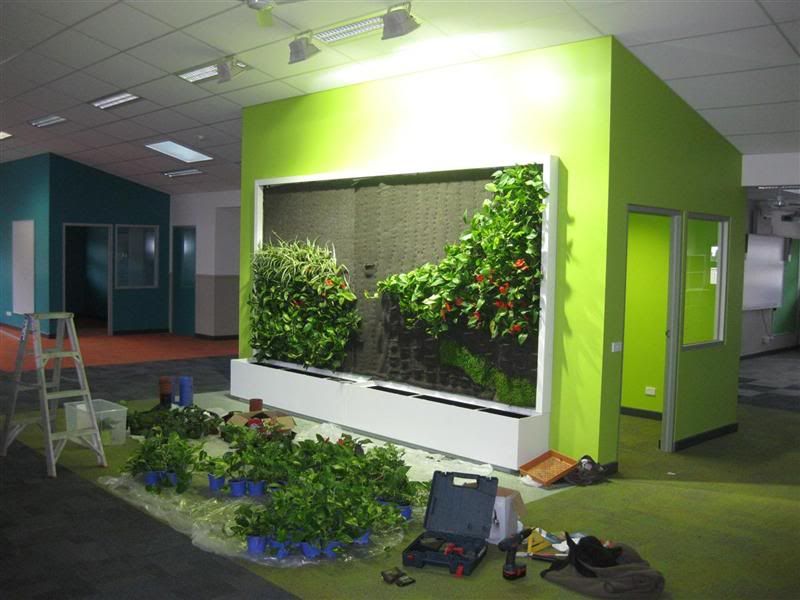
On 7 February 2009, The ‘Black Saturday’ bushfires destroyed the Middle Kinglake Primary School, as well as surrounding schools in Strathewen and Marysville. The Black Saturday bushfires were a series of bushfires that were burning across the Australian state of Victoria and resulted in Australia’s highest ever loss of life from a bushfire. 173 people died as a result of the fires and 414 were injured. Lushe were proud to be involved in the reconstruction effort.
Lushe’s Technical Manager, Josh Engwerda described the project “It was great to be involved in the reconstruction effort and be able to provide of a centre piece for the school”.
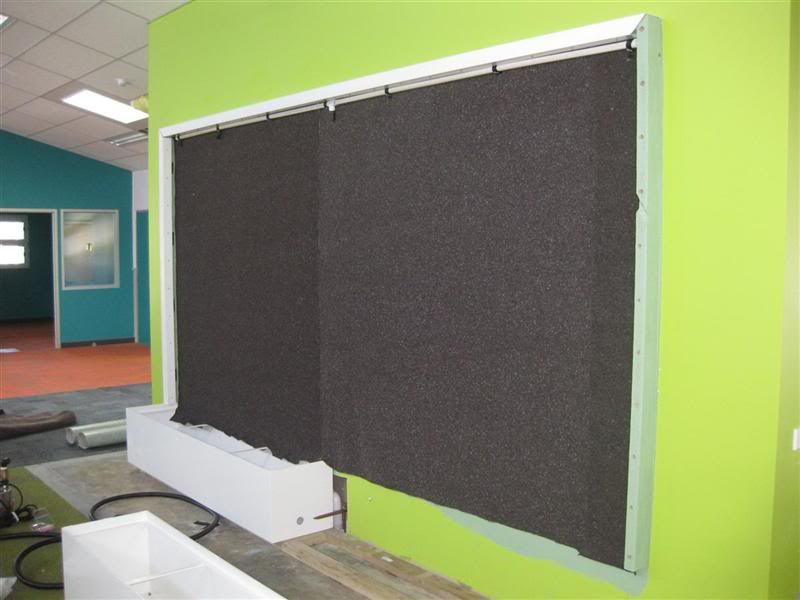
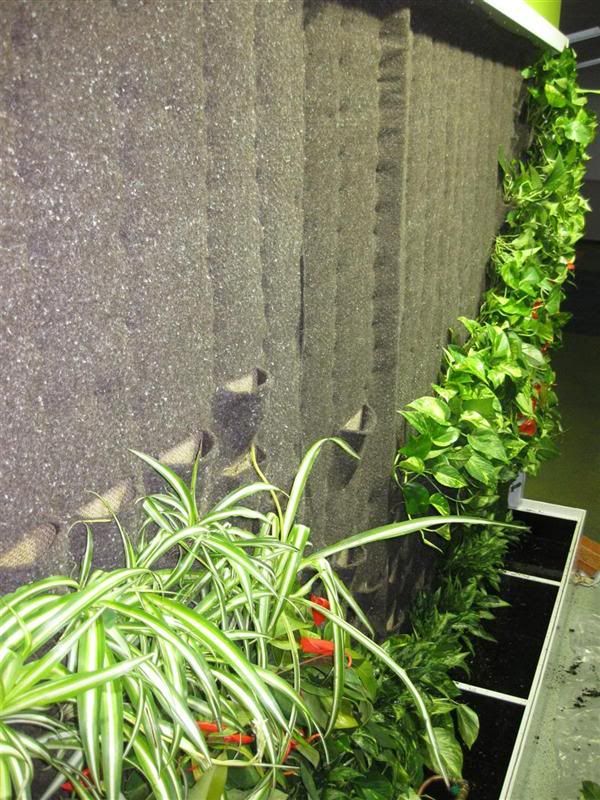
The wall was completed using 12mm marine ply followed by a water proof coating. The felt material chosen was made of 100% recycled plastic bottles, PET, and won’t rot or degrade with time.
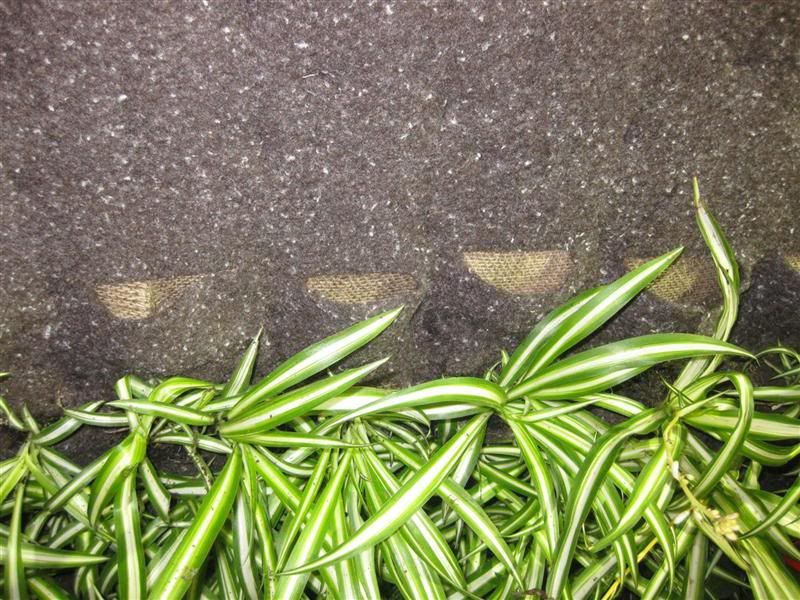
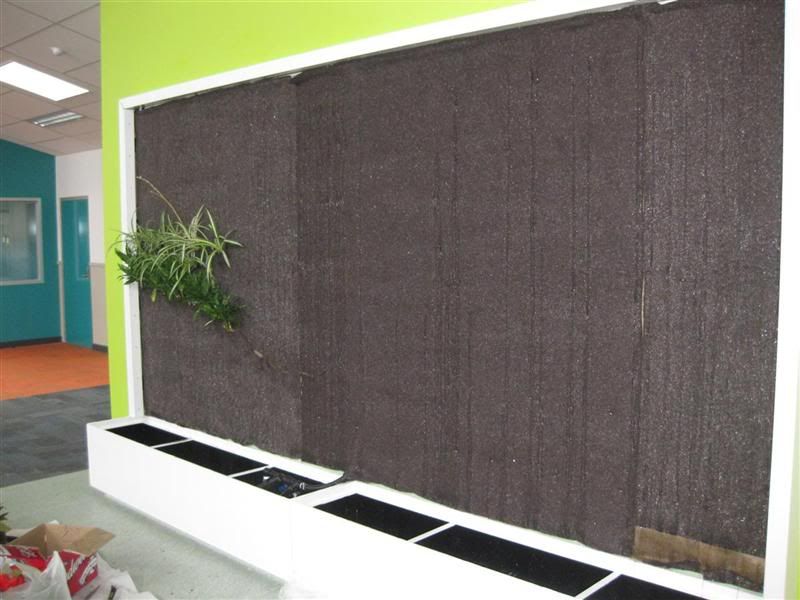
Pockets were cut into the felt just large enough to hold the plants while keeping them nice and close together to give the wall an instant dense look
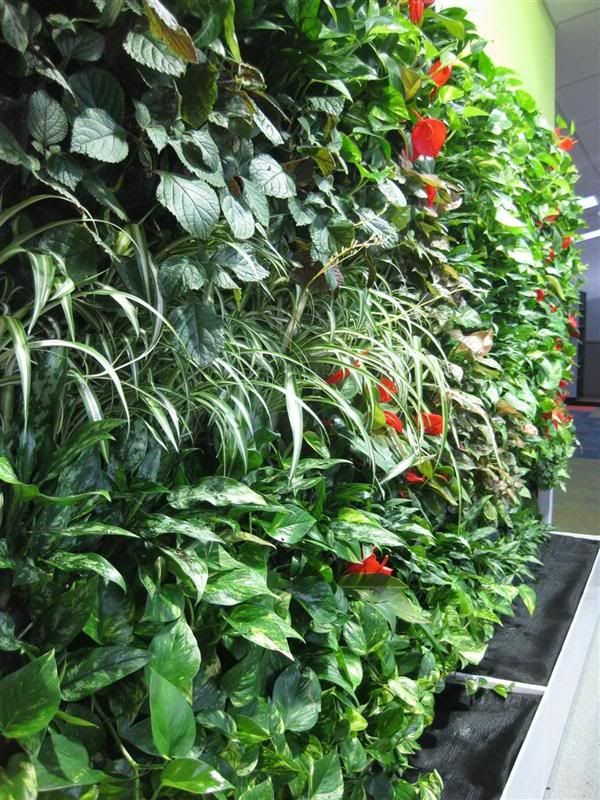
The plants were arranged in horizontal layers to accentuate the contrasting colours, textures and sizes of the differing foliage and flowers.
The felt was stapled every 10-15cm to create the required plant density.
The lights used were three 150W metal halides, the bluish colour of the light is perfect for foliage growth in most plants.
OSA Architects are leading the design of the reconstruction effort at Kinglake Primary Schoo. Geoff Stanistreet, Director, wanted a living wall for not just aesthetic reasons but to also assist in providing better quality air by processing the Co2.
OSA uses many ESD initiatives in its projects mindful of reducing recurrent energy costs to clients whilst providing comfortable indoor environments. Passive cooling and heating is foremost in our designs using products such as Smartroof roof air management systems and good passive design principals.
The plant list includes Syngonium spp, Aglaonema spp, Pothos devils ivy and Anthurium Schirzrianum to name a few.
The water reservoir and pump ensure the plants are well watered and then that water is collected and reused.
Lushe wish the rest of the Kinglake and surrounding communities the best in continuing with their reconstruction effort and rebuilding their lives. Lushe would also like to thank the support provided by the City of Melbourne for assisting with a grant for business development and expansion.
reconstructing rotterdam
http://lushe.com.au/reconstructing-rotterdam/
Reconstructing Rotterdam
Came accross this cool vertical garden design from a blog post with title Reconstructing Rotterdam. Dont have much more information besides that, but it looks very interesting. It certainly makes the ugly building look a lot more attractive
A Van Gogh as green wall painting
http://lushe.com.au/a-wheatfield-with-cypresses/

A Wheatfield, with Cypresses
A Van Gogh painting “‘A Wheatfield, with Cypresses’, painted in September 1889 has been brought to life through a living wall outside the National Gallery at Trafalgar Square.


See the original here

More than 8,000 plants of 26 varieties have been used to create the artwork. The painting will remain through out the English Summer and Autum until October 2011


Installed by specialist horticulture and design company ANS, Each plant was selected to match the original painting.


Watch for update vertical garden photos here
Patrick Blanc Dwell
http://www.dwell.com/outdoor/article/7-great-green-walls
7 Great Green Walls
OCTOBER 10, 2013
Not for the feint of heart, but for the green of thumb: A living wall is a vibrant way to celebrate nature in tandem with architecture. Peek through our archives for another look at living walls and vertical gardens.

Botanist Patrick Blanc designed this Paris aerie for the Dimanche family. Their indoor garden wall is 20 by 23 feet, dominating the living room in the best possible way. Photo by Jessica Antola.
Photo by
Originally appeared in Garden Apartment
Labels:
patrick blanc,
vertical garden,
vertical garden wall
Patric Blanc video
http://library.fora.tv/2011/02/10/Patrick_Blanc_The_Vertical_Garden
Patrick Blanc: The Vertical Garden from California Academy of Sciences on FORA.tv
kunststof ondergrond
pvc is niet erg umweltfreundlich
dioxine?
try EPDM
http://www.conservationtechnology.com/pond_liner_rubber.html
RUBBER POND LINERS
Pond liners made from synthetic rubbers are significantly more flexible and durable than liners made from plastics such as polyvinyl chloride (PVC), high-density polyethylene (HDPE), Polypropylene (PP), or thermoplastic polyolefin (TPO). Understanding the important differences between pond-grade rubbers and roofing rubbers and deciding what type of pond-grade rubber is best for each project requires a rudimentary understanding of how synthetic rubbers are made and how they differ.
SYNTHETIC RUBBER: A synthetic rubber is made by mixing one or more rubber polymers– the chemical backbones of rubbers responsible for their distinctive elastic properties– together with oils, carbon-black, sulfur, and other substances that provide the desired color, flexibility, strength, and hardness. This mixture passes between massive steel rollers which squeeze it into a thin sheet of uncured rubber. Since uncured rubber is very sticky, it must either be dusted with mineral talc (talc-process) or layered between sheets of fabric (talc-free process) so that it can be rolled up without sticking to itself and fusing into one solid mass. The roll is then baked in an oven until it chemically cures into the elastic substance we normally think of as rubber.
EPDM RUBBER: EPDM is the name given to the class of synthetic rubbers made primarily from EPDM polymer, shorthand for Ethylene Propylene Diene Monomer. Although there are hundreds of ways to formulate EPDM rubber from EPDM polymer, all share a chemical structure that gives them extraordinary resistance to heat, cold, sunlight, and air pollution. EPDM has been primarily used for waterproofing in exposed environments where long-term weatherability is essential, such as for waterproofing large flat roofs on commercial buildings. Since an EPDM rubber sheet can be formulated by combining as little as 30% of EPDM polymer with 70% of oils and fillers, it is relatively inexpensive to manufacture. As a consequence, EPDM rubbers are among the lowest priced of all synthetic rubbers.
EPDM RUBBER POND LINERS: The characteristics of an EPDM rubber sheet is determined both by the particular EPDM compound (mixture of ingredients) selected. Since any rubber made primarily of EPDM polymer can be called EPDM rubber, there are many types of EPDM and simply purchasing an EPDM sheet for use as a pond liner can be risky in the absence of information about the other ingredients which make up the majority of the formula. For example, certain curing compounds, fire-retardants, and fillers commonly used in EPDM roofing sheets rubber can be toxic to aquatic life. Pond-grade EPDM rubbers must be specially formulated and tested to be safe for plants, fish, and other aquatic life. We offer two pond-grade EPDM sheets: Pond EPDM and Conservation Technology EPDM, both of which have a long track record of safe use for pond lining.
POND LINER THICKNESS: Thickness of synthetic rubbers is expressed in mils: one mil equals one-thousandth of an inch or one-fortieth of a millimeter. In general, the thickness of rubber has little effect on environmental aging characteristics of a liner, but can have a significant effect on the ease of installation and resistance to mechanical abuse. Irregular free-form garden ponds, especially those smaller than 500 square feet, should be lined with 30 mil (0.75mm) rubber for the neatest results with the fewest folds. Larger free-form ponds, or small ponds with simple rectangular or elliptical shapes, can be successfully lined with 40 mil (1.0mm) or 45 mil (1.15 mm) rubber. Recreational ponds, stormwater ponds, irrigation reservoirs, canals, artificial wetlands, and other large projects are usually lined with 60 mil (1.5mm) rubber since it is easier to seam and is considerably stronger than thinner sheets. 60 mil sheet is also preferred for waterfalls and streams.
POND EPDM: Pond EPDM is our most popular and affordable EPDM rubber pond liner. It is manufactured with the talc process (see above) which leaves a mineral talc residue that gives it a slightly shiny surface: sheet color can vary from dark black to charcoal gray, depending on the amount of talc present. White streaks of talc may be present, but will usually disappear with time. Standard sizes in 45 mil thickness follow. Sizes shown in plain type are stock sizes that generally ship within 24 hours. Sizes in italics are not stock sizes and may involve shipping delays.
| 5 x 5 | ||||||||
| 5 x 10 | 10 x 10 | |||||||
| 5 x 15 | 10 x 15 | 15 x 15 | ||||||
| 5 x 20 | 10 x 20 | 15 x 20 | 20 x 20 | |||||
| 5 x 25 | 10 x 25 | 15 x 25 | 20 x 25 | 25 x 25 | ||||
| 5 x 30 | 10 x 30 | 15 x 30 | 20 x 30 | 25 x 30 | 30 x 30 | |||
| 5 x 35 | 10 x 35 | 15 x 35 | 20 x 35 | 25 x 35 | 30 x 35 | |||
| 5 x 40 | 10 x 40 | 15 x 40 | 20 x 40 | 25 x 40 | 30 x 40 | |||
| 5 x 50 | 10 x 50 | 15 x 50 | 20 x 50 | 25 x 50 | 30 x 50 | 35 x 50 | 40 x 50 | 50 x 50 |
| 5 x 100 | 10 x 100 | 15 x 100 | 20 x 100 | 25 x 100 | 30 x 100 | 35 x 100 | 40 x 100 | 50 x 100 |
| 5 x 150 | 10 x 150 | 15 x 150 | 20 x 150 | 25 x 150 | 30 x 150 | 35 x 150 | 40 x 150 | 50 x 150 |
| 5 x 200 | 10 x 200 | 15 x 200 | 20 x 200 | 25 x 200 | 30 x 200 | 35 x 200 | 40 x 200 | 50 x 200 |
For large water features and lakes we can generally supply the following non-stock roll sizes in 60 mil thickness:
| 10 x 100 | 20 x 100 | 30 x 100 | 40 x 100 | 50 x 100 |
CONSERVATION TECHNOLOGY EPDM: Conservation Technology EPDM Rubber is our highest quality EPDM pond liner. Its superior performance makes it the liner of choice for projects that demand the very best liner available. It is manufactured with the talc-free process (see above) that yields a clean, slightly textured black surface. We custom-fabricate 30 mil, 40 mil, and 60 mil sheets to order, so there are no standard sizes. In addition to simple rectangles, we can make almost any shape that can be drawn as a series of 5'6" strips of rubber (with certain length limitations), such as the following shapes:
 rectangle | 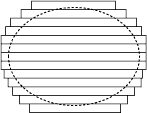 ellipse | 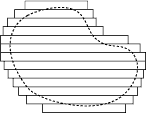 kidney |
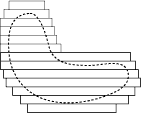 crescent | 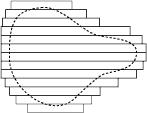 pear | 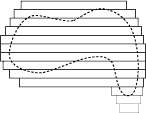 freeform |
CUSTOM THREE-DIMENSIONAL LINERS: Where folds are not acceptable, such as for formal reflecting ponds, we can fabricate three-dimensional rectangular liners with vulcanized corners in Conservation Technology EPDM Rubber. We can also fabricate three-dimensional L-shapes and cylinders, but these can be very expensive and may require long lead times. The walls of the pond must be accurately formed of wood, masonry, or concrete: three-dimensional liners cannot be used with soil or rustic stone walls. The liner can be fastened to the walls with our black metal termination bars and termination bar tapes, or it can be wrapped over the top as shown.
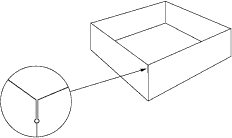
If the liner is to be wrapped over the top of the pond walls,
size the liner at least four inches taller than the pond.
Position the liner in place, and fill it partially with water.
Cut a small round hole at each corner of the pond walls
and slit the corners to make four side flaps.
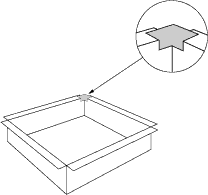
The open corners of the flaps can be sealed with a small square
of uncured repair tape. After the rubber is cleaned, the tape
is positioned so that it hangs over the pond approximately two inches.
Since the tape is stretchable, it can be formed into the corner.
FIELD SEAMS AND REPAIRS: Whenever possible, a pond should always be lined with a single sheet of rubber. Since sizes up to 50 ft x 200 ft are standard in Pond EPDM and even larger sizes are possible in Conservation Technology EPDM, field seaming in residential-scale work is usually limited to joining a stream or waterfall to a pond.
Larger projects such as recreational ponds and reservoirs will require field seaming several large sheets with a two-step process utilizing our self-adhesive seam tapes and laminates that are cold-applied without specialized equipment (see Seams). Note that we do not recommend the use of contact adhesives commonly used for rubber roofing, since these adhesives are too weak and have insufficient resistance to ponded water to be reliable for seaming pond liners. When we supply liners for a project requiring field seaming, our technical staff reviews all the details to make certain that the project can be successfully completed.
Holes can be permanently patched with our self-adhesive repair laminates; stream and waterfall liners can be easily joined to pond liners with our self-adhesive seam tapes (seeRepairs).
LIFETIME: Pond EPDM and Conservation Technology EPDM liners are warranted for twenty years, subject to certain limitations (request written warranty for details). Extensive field experience suggests that they will last longer than twenty years in severe above-ground environments and perhaps longer than fifty years in protected underwater or underground environments.
PACKING AND HANDLING: Pond EPDM liners 50 feet and longer are supplied accordion-folded and rolled; shorter liners are supplied accordion-folded and boxed. Stock 40 mil rolls are shipped on 7 foot cardboard cores; non-stock 40 mil rolls and 60 mil rolls are shipped on 11 ft long cardboard cores. All Pond EPDM liners are supplied boxed, accordion-folded in both directions. Both types of EPDM rubber weigh approximately 0.2 pounds per square foot in 30 mil thickness, 0.3 pounds per square foot in 40 mil or 45 mil thickness, and 0.4 pounds per square foot in 60 mil thickness.
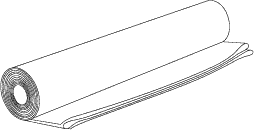 Pond EPDM 50 ft and longer is supplied accordion-folded in rolls. | 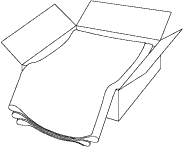 All other liners are supplied accordion-folded in boxes. |
When ordering a large liner, be prepared to get the roll or box off the delivery truck and get it to the site since the delivery company will not do this for you. Position the roll or box at one corner of the pond, either on the surrounding land or within the pond. Carefully remove the roll wrapper or open the box to see how the rubber is folded and then orient the roll or box in the proper direction. After checking the site to make certain there are no sharp objects that could snag the liner, unroll or unfold the liner into a long strip beside or into the pond and then pull the liner across the pond, flapping it slightly to force air under the liner to help it float into place.
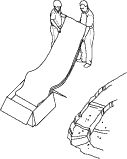 Unfold or unroll the liner, making a long strip beside or within the pond. | 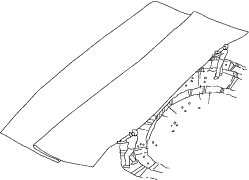 Then pull the liner across the pond, flapping it slightly to force air under the liner to help it float into place |
PRICING:
Pond EPDM Rubber Liners
45 mil Pond EPDM Liner, 5 ft x 5 ft - $18.00
45 mil Pond EPDM Liner, 5 ft x 10 ft - $36.00
45 mil Pond EPDM Liner, 5 ft x 15 ft - $54.00
45 mil Pond EPDM Liner, 5 ft x 20 ft - $72.00
45 mil Pond EPDM Liner, 5 ft x 25 ft - $90.00
45 mil Pond EPDM Liner, 5 ft x 30 ft - $108.00
45 mil Pond EPDM Liner, 5 ft x 35 ft - $126.00
45 mil Pond EPDM Liner, 5 ft x 40 ft - $144.00
45 mil Pond EPDM Liner, 5 ft x 45 ft - $162.00
45 mil Pond EPDM Liner, 5 ft x 50 ft - $180.00
45 mil Pond EPDM Liner, 5 ft x 100 ft - $360.00
45 mil Pond EPDM Liner, 10 ft x 10 ft - $72.00
45 mil Pond EPDM Liner, 10 ft x 15 ft - $108.00
45 mil Pond EPDM Liner, 10 ft x 20 ft - $144.00
45 mil Pond EPDM Liner, 10 ft x 25 ft - $180.00
45 mil Pond EPDM Liner, 10 ft x 30 ft - $216.00
45 mil Pond EPDM Liner, 10 ft x 35 ft - $252.00
45 mil Pond EPDM Liner, 10 ft x 40 ft - $288.00
45 mil Pond EPDM Liner, 10 ft x 45 ft - $324.00
45 mil Pond EPDM Liner, 10 ft x 50 ft - $360.00
45 mil Pond EPDM Liner, 10 ft x 100 ft - $720.00
45 mil Pond EPDM Liner, 15 ft x 15 ft - $162.00
45 mil Pond EPDM Liner, 15 ft x 20 ft - $216.00
45 mil Pond EPDM Liner, 15 ft x 25 ft - $270.00
45 mil Pond EPDM Liner, 15 ft x 30 ft - $324.00
45 mil Pond EPDM Liner, 15 ft x 35 ft - $378.00
45 mil Pond EPDM Liner, 15 ft x 40 ft - $432.00
45 mil Pond EPDM Liner, 15 ft x 45 ft - $486.00
45 mil Pond EPDM Liner, 15 ft x 50 ft - $540.00
45 mil Pond EPDM Liner, 15 ft x 100 ft - $1080.00
45 mil Pond EPDM Liner, 20 ft x 20 ft - $288.00
45 mil Pond EPDM Liner, 20 ft x 25 ft - $360.00
45 mil Pond EPDM Liner, 20 ft x 30 ft - $432.00
45 mil Pond EPDM Liner, 20 ft x 35 ft - $504.00
45 mil Pond EPDM Liner, 20 ft x 40 ft - $576.00
45 mil Pond EPDM Liner, 20 ft x 45 ft - $648.00
45 mil Pond EPDM Liner, 20 ft x 50 ft - $720.00
45 mil Pond EPDM Liner, 20 ft x 50 ft - $1440.00
45 mil Pond EPDM Liner, 25 ft x 25 ft - $450.00
45 mil Pond EPDM Liner, 25 ft x 30 ft - $540.00
45 mil Pond EPDM Liner, 25 ft x 35 ft - $630.00
45 mil Pond EPDM Liner, 25 ft x 40 ft - $720.00
45 mil Pond EPDM Liner, 25 ft x 45 ft - $810.00
45 mil Pond EPDM Liner, 25 ft x 50 ft - $900.00
45 mil Pond EPDM Liner, 30 ft x 30 ft - $648.00
45 mil Pond EPDM Liner, 30 ft x 35 ft - $756.00
45 mil Pond EPDM Liner, 30 ft x 40 ft - $864.00
45 mil Pond EPDM Liner, 30 ft x 45 ft - $972.00
45 mil Pond EPDM Liner, 30 ft x 50 ft - $1080.00
other sizes in 45 mil or 60 mil - $call
Conservation Technology Rubber Liners
30 mil Conservation Technology Pond Liner, 5.5 ft x 82 ft - $call
30 mil Conservation Technology Pond Liner, 5.5 ft wide, per foot - $call
40 mil Conservation Technology Pond Liner, 5.5 ft x 82 ft - $call
40 mil Conservation Technology Pond Liner, 5.5 ft wide, per foot - $call
60 mil Conservation Technology Pond Liner, 5.5 ft x 82 ft - $call
60 mil Conservation Technology Pond Liner, 5.5 ft wide, per foot - $call
pre-fabricated sizes in 30 mil, 40 mil, or 60 mil - $call
Labels:
how to,
plants,
tools,
vertical garden wall
Patrick Blanc London The Driver & Mur Vegetal at The Atheneum
https://hotspotting.wordpress.com/2009/09/11/sneaky-snapshots/


Sneaky snapshots
11092009
I finally got up close and personal with Patrick Blanc’s creations – firstly the vertical garden at The Driver and then the Mur-Vegetal at The Athenaeum!
I’ve taken some great close-up pics of the plants and structure and hope it helps all you aspiring vertical gardeners…
I’ve taken some great close-up pics of the plants and structure and hope it helps all you aspiring vertical gardeners…
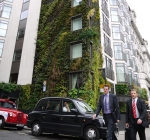 | 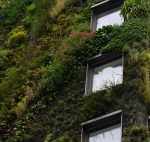 |  |
Although The Driver looks great from the outside, there’s no way of appreciating the wall up-close. Although they have a roof-terrace, it’s not in view of the wall. This is annoying for two reasons –
- I couldn’t take pictures (not good for us!)
- You only get to appreciate the wall when you’re NOT a customer (not good for the people who own The Driver!)
The following photos are therefore taken of The Athenaeum hotel near Hyde Park…

The effect of the huge swathes of plant-life comes from having lots of small plants grouped together.


Patrick Blanc uses a felt layer stapled onto a 1cm thick pvc sheet which is attached to a metal frame. The felt shown above looks really recent as once the wall is established the felt layer discolours as it’s constantly moist from soaking up the water and delivering to the plants and other parts of the felt.

I’m not a felt expert but it looks like regular felt!
On closer inspection you can see that there is a really thin layer of plastic behind the felt. I’m not sure if this is behind the entire felt cover as surely that would affect the water-absorption? Maybe it’s for strength or just to contain part of the rootball?
The intention is that the plants will use the felt instead of soil, although when peering inside one of the pouches i could see a small amount of soil. This soil maybe from when the plant was transferred into the structure as Patrick says on his website that plants can either be from seed, cutting or already grown.

The felt allows the water to be soaked up and distributed. The wall is kept constantly moist – as can be seen from the picture above – it was dripping continuously. That water is then filtered and re-circulated through the arrangement.

I believe there is an elaborate piping system behind the felt and plastic layers. There seems to be two main vertical pipes in the picture above and at least one horizontal just in the above section.
This picture is of the top of a window. I believe the silver container on the top left collects the drips and the pipe then connects this to the rest of the network. As you can see the pipes are intended to be hidden so as not to distract from the display.
The great thing about the felt is that over time it gets its own plant-life growing on it – moss, lichen etc and that greenery fills in the gaps where the plants may not have quite reached.
I recommend you go see Patrick Blanc’s creation at The Athenaeum hotel. The wall goes all the way down to ground level so you can get right up close to it and plan your own vertical garden!
vrijdag 4 september 2015
DIY making of Patrick Blanc Style "mur vegetal"
I also posted the video on the Internet Archive Community Video project so please feel free to re-post/re-purpose it.
http://www.archive.org/details/DiyHowToMakingOfPatrickBlancStyleGreenWallVerticalGarden
The original video is still posted here.
http://vimeo.com/4267171
http://www.archive.org/details/DiyHowToMakingOfPatrickBlancStyleGreenWallVerticalGarden
The original video is still posted here.
http://vimeo.com/4267171
DIY green wall
source:
http://diygreenwalls.blogspot.nl/search?updated-min=2009-01-01T00:00:00-08:00&updated-max=2020-12-01T00:00:00-08:00&max-results=200
How do I make my own greenwall?
Hi,
If you'd like to make your own greenwall I recommend you start at the first post (click this and scroll all the way down to the bottom and read up). That should answer all your questions. After you read all the posts if you still have questions feel free to comment on a post or email me.
Good Luck,
Matt
Sunday, March 8, 2015
Great DIY Greenwall Info in Danish
Per wrote to me to share his blog (in Danish) on his experience making a greenwall. He did a great job documenting his process and his wall turned out really well. He wrote to ask me about my basin. He's using a plastic storage container as a temporary basin. As I have mentioned before my basin is made of expanded PVC. If I could do it again I'd use stainless steel instead. PVC is not a great material for the environment. That said to answer Per's question my basin is glued and screwed together. I'm not sure exactly what glue was used but I did find a PDF for expanded PVC that has a table with acceptable glues. If this blog helped you make a greenwall please send in your photos or any questions that you have.
Thursday, May 2, 2013
Brianna's Question
Brianna wants to build a wall of basil for her restaurant:
Hello! I am going to be building a greenwall of basil in my restaurant and have been scouring over your instructions. I have a few questions for you. 1.) For watering the wall, should you have just one tube at the top of the wall or a few tubes running horizontally at different levels? My wall is going to be about 10 ft. tall. 2.) I clicked on the link to "Jungle Walls" and they suggested using a "non-woven polypropylene geotextile fabric", which looks as if it replaces the moisture retention mat. Do you know anything about this material and if it would in fact work? It's much cheaper than the moisture retention mat, so I was just wondering! Thank you so much for your help! I'm really looking forward to putting my greenwall up!For watering on a 10ft wall one tube across the top should be sufficient. Gravity will do the work. Almost any non-woven synthetic will work. Some fabrics will retain water better than others. You'll need to adjust your watering accordingly to suit your plants. You may want to start with a 2x2 test square before you make your wall. See what works best for basil. That way you aren't losing many plants as you work it out. Good Luck, Matt
Wednesday, May 16, 2012
Adrian's Wall in Uruguay
Adrian wrote:
(This is) the first green wall in my country, Uruguay. South America.. i study architecture and i took on the challenge after seeing it in france.Looks like a beautiful and ambitious wall. Well done Adrian!
Friday, December 30, 2011
Patrick Blanc Presentation at the Academy of Sciences San Francisco
Found this over at Nori's site. I feel like I ran across it once before but I neglected to post it. Don't think I even saw the whole thing. Looking forward to it. So here it is for anyone else who missed it.
Patrick Blanc: The Vertical Garden from California Academy of Sciences on FORA.tv
Patrick Blanc: The Vertical Garden from California Academy of Sciences on FORA.tv
Sunday, May 15, 2011
My Youtube Account Hacked/Canceled. Greenwall Time Lapse Reposted
Last week my youtube account was shut down. As far as I can tell it was either hacked or closed due to copyright infringement (I was using music I didn't own on one of my videos). I reposted my time lapse greenwall planting video with music by Omniphobe; my friend Eef's band.
I need your help. If you know a blog where my old video was posted can you please let them know that I reposted it here. Thanks.
I also posted the video on the Internet Archive Community Video project so please feel free to re-post/re-purpose it.
http://www.archive.org/details/DiyHowToMakingOfPatrickBlancStyleGreenWallVerticalGarden
The original video is still posted here.
http://vimeo.com/4267171
Friday, May 6, 2011
Sophie's Questions
Sophie asked some questions about getting a wall started:
Here are the answers to your questions Sophie:
1. The first layer is the frame. Usually that's made of aluminum or wood. Then there's a waterproof layer of plastic. Lately I have been using recycled corrugated polyethylene sheeting; 2 sheets 6mm thick layered to make 12mm.
2. Click here to see the MRM that I use. It is 3/16" thick and in my experience has been thick enough. I have seen some Blanc walls that have used an even thinner material. The material is stapled to to the plastic in two layers. The cuts for pockets are only made to the first layer.
3. The dirt from the pot is left around the roots.
Because you are making a wall outside you should also consider adding a plastic woven or pierced layer behind and in between you MRM sheets. See this post for more info.
Good Luck,
Matt
Hi Matt,
I´ve read your blog with great interest and I have some questions on the construction of a green wall meant for the outdoor. As far as I can understand there is first a layer of treated wood or pvc, attached to that is a mesh of stainless steel and the comes the fabric. And here is my question. I´ve been looking at the MRM, but to me it doesn´t seem thick enough for cutting and putting in the plants? How thick is it? And does it only need one layer? Does the cutting of the holes go the whole way through?
Also when the plants are out into the holes, are the roots then cleaned for dirt?
This was just some practical wondering that I hope you may be able to help me with.
Best regards
/Sophie
Here are the answers to your questions Sophie:
1. The first layer is the frame. Usually that's made of aluminum or wood. Then there's a waterproof layer of plastic. Lately I have been using recycled corrugated polyethylene sheeting; 2 sheets 6mm thick layered to make 12mm.
2. Click here to see the MRM that I use. It is 3/16" thick and in my experience has been thick enough. I have seen some Blanc walls that have used an even thinner material. The material is stapled to to the plastic in two layers. The cuts for pockets are only made to the first layer.
3. The dirt from the pot is left around the roots.
Because you are making a wall outside you should also consider adding a plastic woven or pierced layer behind and in between you MRM sheets. See this post for more info.
Good Luck,
Matt
Sunday, April 24, 2011
Great Mobile Geenhouse Project
Hi,
My friend's brother is making this awesome mobile greenhouse to teach people about sustainable living. They need some help to reach their kickstarter goal so please pledge if you can.
Thanks,
Matt
Learn more below.
My friend's brother is making this awesome mobile greenhouse to teach people about sustainable living. They need some help to reach their kickstarter goal so please pledge if you can.
Thanks,
Matt
Learn more below.
Friday, April 22, 2011
Simple Greenwall How to on the Nate Berkus Show
My wife and I were featured on the Nate Berkus Show's House Proud segment. At the very end I got to do a small greenwall planting demo.
Saturday, February 26, 2011
Phillip's Making of Video
Phillip sent me a making of video for his wall. I love to see the process behind the creation of people's walls. Thanks for making and sharing this Phillip.
At the end of the video you can see Phillip's first wall that he gave to his Mom. Phillip said:
At the end of the video you can see Phillip's first wall that he gave to his Mom. Phillip said:
I forgot to tell you that 1 great thing with vertical gardens is its transferable. i just changed some plants on my first attempt and gave it to my mom to transform her dull wall to a lush greenery. funny thinking about a garden being transported by a van...
Irrigation Filter Install
So for awhile now I have been mentioning how important it is to have a filter on your irrigation system. Mine never really had one and I wasn't very good at keeping dirt and plant matter out of my basin. Periodically I would have to take down my irrigation hose and clean out the clogged holes with a paperclip while running water through it. This was a time consuming process. This is the hose waiting to be cleaned in my bathtub.
 This is how I close off the end of the hose. In order to clean it I have to remove the hose clamps so that I can get water flowing out the end.
 While I had the irrigation apart I thought I'd take a photo of this T splitter. As you can see the tube that brings the water up from the pump is quite large. But then the splitter steps it down to a thinner size for the tubes that run across the top of the wall. This was recommended by the person who helped set up my pump system. The idea was that you wanted less pressure (a wider hose) when you were pushing water up vertically. When you got to the top and you were pushing horizontally you could use a thinner hose. This isn't 100% necessary but if you can do it it makes sense.
 This is the filter I bought. Technically it's called a strainer. I bought it from here. It was the wrong size unfortunately (too small) so I added little sleeves to it so that it would fit. This is the filter with the sleeves.
 I originally thought this would fit on the vertical tube running up from the pump before it hit the T. I was so off with the size estimate that it was even too small for the horizontal tube. With the sleeves it fits but I can only have it on one side of the T. I chose to put it on the longer side. The short side is much easier to clean should it ever clog again.

 I finally cleaned the sponge that the filter came with. I don't know why I didn't do this sooner. I also cleaned out the basin around the filter. There was quite a bit of dirt and decomposing leaves. Also that weird white Styrofoam stuff they put in soil. That stuff was the biggest pain. After I cleaned the sponge I added this mesh bag over it that I had from a my fishtank. It's a very fine mesh and should prevent most things from even getting into the pump in the first place. The mesh came from one of these.
When I emptied the basin I learned that my basin holds far less water than I thought. Originally I estimated it at around 35 gallons. In reality my basin holds less than 15 gallons. I add 5 gallons to it every 2 days to keep up with water loss. So my wall uses roughly 2.5 gallons of water a day for 80sqft.
These are the things to learn from my mistakes. Don't let dirt and plant matter get in your basin to begin with. If possible plant your wall before adding your basin. When you need to remove plants to replace them make sure the basin is well covered. Have two filter systems for a backup just in case. I now have one at the pump and one in the hose.
 This is the hose waiting to be cleaned in my bathtub.
 This is how I close off the end of the hose. In order to clean it I have to remove the hose clamps so that I can get water flowing out the end.
 While I had the irrigation apart I thought I'd take a photo of this T splitter. As you can see the tube that brings the water up from the pump is quite large. But then the splitter steps it down to a thinner size for the tubes that run across the top of the wall. This was recommended by the person who helped set up my pump system. The idea was that you wanted less pressure (a wider hose) when you were pushing water up vertically. When you got to the top and you were pushing horizontally you could use a thinner hose. This isn't 100% necessary but if you can do it it makes sense.
 This is the filter I bought. Technically it's called a strainer. I bought it from here. It was the wrong size unfortunately (too small) so I added little sleeves to it so that it would fit. This is the filter with the sleeves.
 I originally thought this would fit on the vertical tube running up from the pump before it hit the T. I was so off with the size estimate that it was even too small for the horizontal tube. With the sleeves it fits but I can only have it on one side of the T. I chose to put it on the longer side. The short side is much easier to clean should it ever clog again.
 I finally cleaned the sponge that the filter came with. I don't know why I didn't do this sooner. I also cleaned out the basin around the filter. There was quite a bit of dirt and decomposing leaves. Also that weird white Styrofoam stuff they put in soil. That stuff was the biggest pain. After I cleaned the sponge I added this mesh bag over it that I had from a my fishtank. It's a very fine mesh and should prevent most things from even getting into the pump in the first place. The mesh came from one of these.
When I emptied the basin I learned that my basin holds far less water than I thought. Originally I estimated it at around 35 gallons. In reality my basin holds less than 15 gallons. I add 5 gallons to it every 2 days to keep up with water loss. So my wall uses roughly 2.5 gallons of water a day for 80sqft.
These are the things to learn from my mistakes. Don't let dirt and plant matter get in your basin to begin with. If possible plant your wall before adding your basin. When you need to remove plants to replace them make sure the basin is well covered. Have two filter systems for a backup just in case. I now have one at the pump and one in the hose.
Wednesday, February 16, 2011
Lushe's "Regeneration Wall"
This beautiful wall was just completed in Australia by Lushe. I'm particularly glad they documented the process. They used marine plywood as a base which is something that's readily available in most places. Also they used Baby's Tears which is a beautiful small leafed plant.


Wednesday, February 9, 2011
Carlos' Wall Un Año Después
Carlos posted a great time lapse video of an update to his wall.
It sounds to me that Carlos may have been over watering a bit for his climate if he was struggling with oxgenation and fungal and bacterial infections. Make sure you set your watering cycles to allow your wall to dry off. Most plants need wet and dry cycles.
It's great to see Carlos sticking with his wall and updating it.
Thanks for the update Carlos.
Matt
Hi Matt
After nearly a year, a fungal infection, pests and several dead plants I want to share the restoration of my Vertical Garden Patrick Blanc style.
http://www.youtube.com/watch?v=741_YPmpi5o
I learned a bit in this process, for example, something important is to improve ventilation to avoid the appearance of fungal and bacterial infections, so I put a ceiling fan near the vertical garden. I changed the felt by one of lesser quality, which has a more open fabric for increasing oxygenation and ventilation of the roots and substrate. Also, I changed the substrate by a sphagnum peat moss, I hope this help to a better plant growing. Related to the pests, I have to tell you that in my tropical town is a headache, particularly Planococcus insects, this kill some plants and weakened other. Finally about my first video, I have put some notes in Spanish that explain a little the construction process.
Congratulations for keeping live your great blog
Regards
Carlos Pacheco
It sounds to me that Carlos may have been over watering a bit for his climate if he was struggling with oxgenation and fungal and bacterial infections. Make sure you set your watering cycles to allow your wall to dry off. Most plants need wet and dry cycles.
It's great to see Carlos sticking with his wall and updating it.
Thanks for the update Carlos.
Matt
Wednesday, January 12, 2011
No more pump sucking
Forgot to mention that I changed my irrigation setting a few weeks ago. The pump was running too long per watering and the basin would get very low and the pump would make a sucking noise. So I timed the watering until the pump made a noise and used that for my baseline. I think I went from watering about 4 times a day for 8 minutes to watering 7 times (every 2 hours) a day 2 minutes per watering. Not very scientific but it hasn't affected the plants at all and now I don't have to hear the pump sucking. Bear in mind that the actual water volume probably hasn't changed much because when the basin got low the water volume being sucked up was greatly reduced.
Phillip's Update
I love it when people send me updates on how their wall is doing. This one is from Phillip in The Phillipines. Phillip first wrote in to tell me about the alternative materials he used to make his wall. I was particularly impressed when he used speaker cabinet fabric for his moisture retention material. He proves that almost any dense synthetic felt can work. Here's Phillips update:

Hi matt,
i just pruned my vertical garden, my copea's started to bud and new offsprings of bromeliads can be seen. sent pictures as to the condition of my vertical garden it looks good but i think I have to change the prayer plant and the fern because its in direct sunlight and leaves start to get burnt. Im thinking of building my next green wall next week. ill keep you posted.
thanks
phillip

Fabian's Update
So Fabian wrote in with an update on the amazing wall he worked on in Bangalore India. Fabian first wrote in when he was trying to source moisture retention fabric in India for theJaaga Living Building project.
The project has come a long way since those cool mock ups. Here's the update:


Click here to see more photos of the Jaaga Living Building project.
The project has come a long way since those cool mock ups. Here's the update:
Hey Matt,
long time no update.
It takes quite a loooong time to find the right plants for the wall.
Plants that can take the rough Indian environment and the not
so well watersoaking coir felt.
Still testing with drip irrigation and different times of watering.
Check out some pictures:
http://www.fabsn.com/theblog/2011/01/india-vertical-garden-update/
Cheers
Fabian


Click here to see more photos of the Jaaga Living Building project.
Greenwall in a picture frame on Etsy
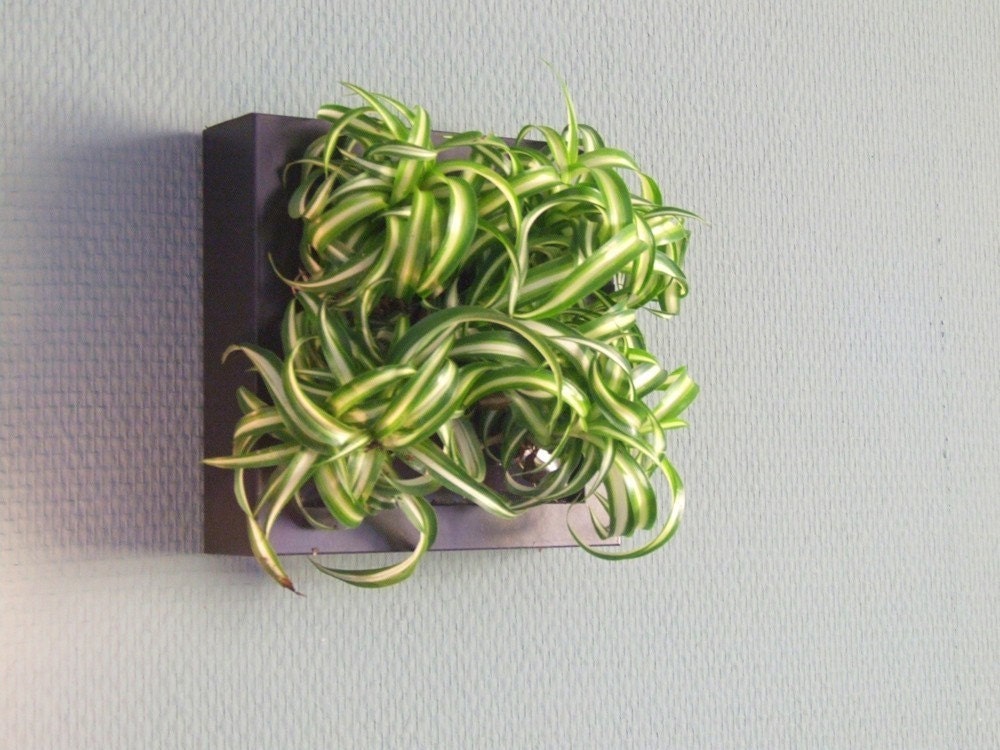
I don't normally post about greenwalls I run across online. There are already great sites for that like Lushe, but this greenwall in a frame on Etsy was too cute to pass up.
Sam's Update
Sam originally contacted me about damp smell that was coming from his greenwall, in his restaurant in Auckland New Zealand, with over 1,500 plants. Sam sent me a great update with some beautiful pictures.
Sam wrote:


I am also a planted fishtank keeper and Sam's bacteria problem seems strange to me. Instead of adding something that kills bacteria I'd rather see him add something that establishes a healthy colony of good bacteria. All planted fishtanks have aerobic and anaerobic bacteria living together and healthy tanks do not have an odor. The basin of a greenwall is like a simple pond/fishtank in many ways. I add aquatic snails and worms to my basin to help breakdown plant material and add a natural fertilizer source.
Sam also mentions blocked pipes. I can't stress enough how important it is to include inline filters between your pump and your irrigation tube. Without these filters you will need to check your tubes for clogs like Sam and I. I still haven't retrofitted a filter to my system so I periodically take the top irrigation tube down and clean it out. I also do some spot unclogging with a paper clip. All of which could be avoided with a good filter.
Sam's wall looks amazing and is by far one of the most ambitious walls that was ever inspired by this site. Congratulations Sam!
Sam wrote:
Hi Matthew,
These are some of the better pictures, they were taken to profile the restaurant directly, not so much for the wall itself, but I how they suit.
The wall is made up of 1700 plants, over a 6m high x 4m wide wall, that returns around on one side (the left) so its double sided for 2m .
The plants are mainly peace lily's, boston and hen& chicken ferns, and spider plants, planted into 3 layers of Hydrotech felt (which we got from you), secured back to the same ply that you used, fixed to a steel frame. We used steel as the weight of our wall was so much.
The trough at the bottom is custom made stainless steel trough, clad with raw steel for the right look - the water in the pump is then reticulated through pipework at the top of the wall by a pump. We have 5 hydroponic lamps set up to go on for 8 hours a day overnight.
We PH test, add nutrients (including clearwater), clear blocked pipes, and check all plants twice weekly... and flush out the trough once per week...
so two months in, the wall is really flourishing, it takes a fair bit of work to keep it this way though! The great thing about your style of wall is that you can get it looking amazing from the first day of installation, and you can put it together yourself if you do your homework, and get some good people to help you out.
The smell has diminished substantially also with the addition of 'clearwater' to kill of the odour causing bacteria.
So... finally... cheers for your blog and you tube post!
cheers


I am also a planted fishtank keeper and Sam's bacteria problem seems strange to me. Instead of adding something that kills bacteria I'd rather see him add something that establishes a healthy colony of good bacteria. All planted fishtanks have aerobic and anaerobic bacteria living together and healthy tanks do not have an odor. The basin of a greenwall is like a simple pond/fishtank in many ways. I add aquatic snails and worms to my basin to help breakdown plant material and add a natural fertilizer source.
Sam also mentions blocked pipes. I can't stress enough how important it is to include inline filters between your pump and your irrigation tube. Without these filters you will need to check your tubes for clogs like Sam and I. I still haven't retrofitted a filter to my system so I periodically take the top irrigation tube down and clean it out. I also do some spot unclogging with a paper clip. All of which could be avoided with a good filter.
Sam's wall looks amazing and is by far one of the most ambitious walls that was ever inspired by this site. Congratulations Sam!
Monday, December 20, 2010
Phillips Great Alternative Materials Wall


Phillip wrote in to explain how he built his first wall using alternative materials available to him in the Philippines. I think this is a beautiful wall with some very smart materials choices. I'm particularly interested in the marine plywood for substructure as this is available everywhere and much more eco-friendly than PVC sheets. I love the variety of plants and the dense planting. Also the composition of the plants and the textures are beautiful. Nice job Phillip. Please stay in touch and let me know how your wall develops. I suspect you'll be doing a lot of pruning to keep up with growth.
Dear Matt,
Im Phillip from the Philippines. I went for a vacation in Thailand and saw the beautiful green walls in Siam Paragon that is why have researched it right away and came across your video in youtube. I was redirected to your bloggsite and read all about it, hence making my own green wall. The first problem i encountered was the felt as it is not available here in my country so i used a carpet fabric that is being used for speaker boxes. I also used marine plywood covered in canvass as to protect the wood from water as pvc boards are not yet available here. I tried to slit the fabric as detailed in one of the blogs in your page and had problems in planting as not to all my plants are 3" pots. but we pulled it off and finished the wall. my wall is now 2 weeks old and i want to thank you for a very informative site i just hope it my wall lasts as i have not used the materials indicated in your site and Patrick blancs book "the vertical Garden"
I attached some pictures of my first attempt.
thank you
sincerely
phillip
Monday, September 13, 2010
Bacteria and Mold
I received two emails recently regarding mold/bacteria on walls. Sam wrote:
I replied to Sam via email and asked him how often he was watering. If his wall is going through distinct wet/dry cycles I'd think the bacteria wouldn't really be an issue. Also it seems odd to me that anaerobic bacteria would be an issue with plants in synthetic felt as it is a fairly open material. Was this wall made with synthetic felt for it's moisture retention layer? Sam if you are out there please let me know more. Also I'd love to post pictures of your wall so please send them in.
Jared wrote in about mold growing on his wall:

I've never had a problem with mold on my wall. I'd be curious to know about your wet/dry cycles. How often are you watering; amount and length of time. What material did you use for your felt? Let me know in the comments please.
If you have any helpful suggestions for Sam or Jared please comment. I'm no expert when it comes to mold/bacteria so any and all help would be appreciated.
Thanks,
Matt
"Hi Matthew,
My name is Sam, i'm from auckland NZ and we built a large green wall based off your video on you tube after reaching a lot of brick walls with landscape companies, so we decided to do it ourselves.
Our wall is progressing really well, the density is great, some plant types have not done so well, but almost all have survived, and thats about 1500 plants! The one issue we are having is smell. After 2 months, the felt we used has water in it of course, and has started to smell damp and musty. On invetsigataion with our hydroponics consultant he told us is was being caused by anaerobic bacteria in the felt. He advised us to use "waterclear" that is available that goes in the water system and kills the bacteria, and he has assured me that it is not only safe for the plants but it improves the oxygen available to them. So we have tried this and while not much has happened since we applied it, it is early days.
I was wondering if you had come across this or have any advice?
cheers"
I replied to Sam via email and asked him how often he was watering. If his wall is going through distinct wet/dry cycles I'd think the bacteria wouldn't really be an issue. Also it seems odd to me that anaerobic bacteria would be an issue with plants in synthetic felt as it is a fairly open material. Was this wall made with synthetic felt for it's moisture retention layer? Sam if you are out there please let me know more. Also I'd love to post pictures of your wall so please send them in.
Jared wrote in about mold growing on his wall:

"Hey,
First off I just wanted to say I love your blog. Without it I don't know if I would have gotten my greenwall up and running nearly as well. I'm having a problem, though, that I was hoping you might know a solution for. My wall has only been up for about 4 weeks, but a little over a week ago I noticed small amounts of mold growing on the felt material I used. I've been using a vinegar/water mixture to kill it, and it works without hurting my plants, but it only kills what has already grown, and doesn't prevent further growth once the vinegar is diluted. Do you have a safe solution that might work? I was considering moving my wall so it receives direct sunlight. I heard mold has a much harder time growing with enough sun.
My wall doesn't compare to yours, but I've attached a picture in case you wanted to see. It's a self-standing wall which is why I'm able to move it when I need to. It's not completely done yet. I'm a poor grad student so I'm adding plants little by little when I can spare the money. I'll be adding another 15 today actually. In the picture I'm sending only about half is covered so far. If your interested I can send you another picture once it is complete.
I hope to hear from you soon, and thanks again for your blog. It is amazing!
-Jared Brown"
I've never had a problem with mold on my wall. I'd be curious to know about your wet/dry cycles. How often are you watering; amount and length of time. What material did you use for your felt? Let me know in the comments please.
If you have any helpful suggestions for Sam or Jared please comment. I'm no expert when it comes to mold/bacteria so any and all help would be appreciated.
Thanks,
Matt
Wednesday, September 1, 2010
Great alternative to PVC suggested by Eric
Eric wrote:
Thanks Eric and keep the basin suggestions coming. Readymades and materials suggestions are all welcome.
Hi Matt,
This is a great blog, thank you for taking the time!
I have been searching the web for actual construction details to build a living wall.
A suggestion for basin construction. Use 45mil EPDM synthetic rubber membrane.
(To me this is the easy part ;)) I design and build ponds and waterfalls for a living.
EPDM is reusable, recyclable, and has better environmental impact profile than PVC. - See below
1) Build a basic plywood box in whatever shape and dimensions you need.
2)Calculate liner size L x W needed like so:
L x W
(length + 2x Height)X(width + 2x Height)
3)Line the box with 45 mil EPDM rubber, -folding it like a gift box in reverse it to fit the shape of your box.
3) Use a staple gun to attach liner to top edge of your box, and trim the edges with a blade or sharp scissors.
EPDM is available in custom cut sizes as pond liner for water gardens at many garden centers and is available on line at any pond supply place in 5 ft. increments.
*Ethylene propylene diene (EPDM) type rubber is recommended by the Danish Environmental Protection Authority as an alternative to PVC."
"Alternatives to dioxin sources in the Mediterranean," by Beverley Thorpe, Clean Production Action for Greenpeace Mediterranean Project (September 1996)
http://archive.greenpeace.org/toxics/reports/btf.html ( As found in Google Answers Answered By: mother-ga on 14 Jun 2002 14:30 PDT)
Thanks Eric and keep the basin suggestions coming. Readymades and materials suggestions are all welcome.
Monday, August 30, 2010
Jaaga's Living Building
Fabian Sixtus Koerner (quite possibly the coolest name ever) wrote to me awhile back looking to source moisture retention material in India. I sent him this link for locally made coir fabric used for greenrooves.
Fabian wrote again recently to share his work on his amazing Living Building. It's got every eco thing you can think of; solar panels, roof gardens, vertical gardens, aquaponics, composting, and more. What an amazing project! Check it out for yourself here.

Fabian wrote again recently to share his work on his amazing Living Building. It's got every eco thing you can think of; solar panels, roof gardens, vertical gardens, aquaponics, composting, and more. What an amazing project! Check it out for yourself here.

Saturday, July 31, 2010
Plant spacing
Patrick asked:
This is a great question. I agree that plant density is one of the things that really makes my wall work. We cut 5 inch pockets separated by only 2 inches in between. Then we staggered the rows vertically and separated them by 4 inches. The plants we used were from 3 inch pots. I hope that makes sense. Here's a simple diagram.
(--------5 inches--------)(2 inches)(--------5 inches--------)
|
| 4 inches
|
------)(2 inches)(--------5 inches--------)(2 inches)(--------
Good Luck,
Matt
Hi Matt. I really like your green wall and have decided to make one of my own. What I like about your's in particular is the density of all of the plants. I noticed that you used a string in the beginning as a guide to make straight and even pockets for the plants. Did you space them about 6" apart?
Also, any ideas on a basin?
Thanks,
Patrick
This is a great question. I agree that plant density is one of the things that really makes my wall work. We cut 5 inch pockets separated by only 2 inches in between. Then we staggered the rows vertically and separated them by 4 inches. The plants we used were from 3 inch pots. I hope that makes sense. Here's a simple diagram.
(--------5 inches--------)(2 inches)(--------5 inches--------)
|
| 4 inches
|
------)(2 inches)(--------5 inches--------)(2 inches)(--------
Good Luck,
Matt
Sunday, June 27, 2010
Light
Raquel said...
Hi Raquel,
I use compact fluorescent bulbs. They are NOT full spectrum. I think they may be "cool white". From "Ecology of the planted aquarium" by Diane Walstad she shows that "cool white" is almost as good as full spectrum for growing plants.
Matt
And what about the light?
because where I'm plannig to build my wall doesn't have direct sunlight, there's just artificial light... what kind of lights do I need?
Thanks for answer!
=)Raquel
Hi Raquel,
I use compact fluorescent bulbs. They are NOT full spectrum. I think they may be "cool white". From "Ecology of the planted aquarium" by Diane Walstad she shows that "cool white" is almost as good as full spectrum for growing plants.
Matt
Monday, June 21, 2010
Dan's Question
Dan wrote:
The seams were sealed with silicone. So were the screws I believe. Just a dab on the screw head. Our basin was made from PVC ( a material I wouldn't use again due to it's environmental impact). It was glued together with special glue. The shape is quite unusual because it ducks under our cabinet at one point. Also it's curved to match the shape of the wall. Most basins will be much simpler.
Matt
Hi, Love the blog!
I was wondering how you sealed the seams between the PVC sheets and the screw/rivet attachment points to the wall. You mention the gutter at the bottom but don't really say how it was made or what it looks like. These details would really help me.
Thanks,
Dan
The seams were sealed with silicone. So were the screws I believe. Just a dab on the screw head. Our basin was made from PVC ( a material I wouldn't use again due to it's environmental impact). It was glued together with special glue. The shape is quite unusual because it ducks under our cabinet at one point. Also it's curved to match the shape of the wall. Most basins will be much simpler.
Matt
Thursday, May 20, 2010
The Basin Challenge
General Houseplant Care wrote:
Basin's are probably one of the more tricky parts of greenwall building. As I've said before mine was made from PVC (a material I wouldn't use again because of it's environmental impact). I would suggest building basins from non-toxic plastic, epoxy covered wood, stainless steel, or something readymade.
If you have a good basin solution please send it in.
Thanks,
Matt
"Great work guys! I love your site, and am currently working on building my own green wall.
I am having trouble sourcing a trough, though, and am wondering what you guys used?
Thanks for your help!!!"
Basin's are probably one of the more tricky parts of greenwall building. As I've said before mine was made from PVC (a material I wouldn't use again because of it's environmental impact). I would suggest building basins from non-toxic plastic, epoxy covered wood, stainless steel, or something readymade.
If you have a good basin solution please send it in.
Thanks,
Matt
Which felt?
Felipe wrote:
The felt I use (MRM) is made for greenroof installations. A hydroponic felt may be similar but I'm not sure. Click here for a data sheet on the felt I used. That should help with comparisons. Here's the basic information cut and pasted from the sheet:
Moisture Retention Mat is composed of high-quality, recycled, non-rotting, poly-propylene fibers.
Moisture Retention Mat is used in the Hydrotech Garden Roof Assembly to retain moisture and nutrients for use by the vegetation layer.
THICKNESS: 3/16 in. (≈200 mils)
SIZE: 7.5 ft. X 100 ft. (2.3m X 30.5m) - in rolls
(715 sq.ft. effective coverage)
WEIGHT: 16 oz./yd2 (542 g/m2) 0.11 lb./sq.ft. (0.54 kg./sq.m.) - dry;
1.2 lb./sq.ft. (5.9 kg./sq.m.) - wet
WATER RETENTION CAP.: ≈0.13 gal./sq.ft. (5.3 l./sq.m.)
TENSILE STRENGTH: 380 lb (1.69 kN) ELONGATION: 50%
(ASTM D4632) (ASTM D4632)
TRAPEZOIDAL TEAR: 145 lb/in2 (0.644 kN) PUNCTURE STRENGTH: 240 lb (1.07 kN)
(ASTM D4533) (ASTM D4833)
Good Luck,
Matt
"Hi Matt , My name is Felipe , i'am form Chile and i'm going to star my own green wall, but I have a question because i don't know what kind of felt i need, if i can use the felt used for hydroponics that i can get in many stores or have to be an special felt? please please try to answer. I'll be very grateful
Big Hug
Felipe."
The felt I use (MRM) is made for greenroof installations. A hydroponic felt may be similar but I'm not sure. Click here for a data sheet on the felt I used. That should help with comparisons. Here's the basic information cut and pasted from the sheet:
Moisture Retention Mat is composed of high-quality, recycled, non-rotting, poly-propylene fibers.
Moisture Retention Mat is used in the Hydrotech Garden Roof Assembly to retain moisture and nutrients for use by the vegetation layer.
THICKNESS: 3/16 in. (≈200 mils)
SIZE: 7.5 ft. X 100 ft. (2.3m X 30.5m) - in rolls
(715 sq.ft. effective coverage)
WEIGHT: 16 oz./yd2 (542 g/m2) 0.11 lb./sq.ft. (0.54 kg./sq.m.) - dry;
1.2 lb./sq.ft. (5.9 kg./sq.m.) - wet
WATER RETENTION CAP.: ≈0.13 gal./sq.ft. (5.3 l./sq.m.)
TENSILE STRENGTH: 380 lb (1.69 kN) ELONGATION: 50%
(ASTM D4632) (ASTM D4632)
TRAPEZOIDAL TEAR: 145 lb/in2 (0.644 kN) PUNCTURE STRENGTH: 240 lb (1.07 kN)
(ASTM D4533) (ASTM D4833)
Good Luck,
Matt
Wednesday, May 5, 2010
My Greenwall in the New York Times Home Section
I was interviewed by Kristina Shevory from the New York Times about my greenwall but I couldn't blog about it until I saw this.

I thought I was on the cover until I learned that the image rotates. Doh! But it's so exciting to be in the article and to be the main image.
Also Peter Kastan was mentioned too and I am so envious of the beautiful diversity of the plants on his wall. Here's an excerpt from the article.


Gardens That Grow on Walls By KRISTINA SHEVORY
Excerpt:
Last year, inspired by Mr. Blanc’s work, Matthew McGregor-Mento, 38, an executive creative director at Gyro: HSR, a New York advertising agency, and his wife, Emma, 35, a massage therapist, set out to build a vertical garden in their two-bedroom apartment in the East Village. They attached an 8-by-10-foot aluminum frame to a wall in the entry hall, screwed waterproof sheets of PVC to the frame and tacked on two layers of matting. Then they inserted some 400 plants — philodendrons, ivies and ferns — into holes they cut in the felt.
A trough they installed along the floor collects runoff water from the irrigation system, and a pump with a filtration sponge sends it back up the wall. Timers control the watering, which happens four times a day.
The design, which they devised with the help of a horticulturalist friend, was based on Mr. Blanc’s system and on research they had done online. The total cost was $3,000, but the result was worth it, Mr. McGregor-Mento said. Most people who visit want a green wall of their own, and the effort involved wasn’t that onerous: “Building a vertical wall is about as difficult as painting a room.”

I thought I was on the cover until I learned that the image rotates. Doh! But it's so exciting to be in the article and to be the main image.
Also Peter Kastan was mentioned too and I am so envious of the beautiful diversity of the plants on his wall. Here's an excerpt from the article.


Gardens That Grow on Walls By KRISTINA SHEVORY
Excerpt:
Last year, inspired by Mr. Blanc’s work, Matthew McGregor-Mento, 38, an executive creative director at Gyro: HSR, a New York advertising agency, and his wife, Emma, 35, a massage therapist, set out to build a vertical garden in their two-bedroom apartment in the East Village. They attached an 8-by-10-foot aluminum frame to a wall in the entry hall, screwed waterproof sheets of PVC to the frame and tacked on two layers of matting. Then they inserted some 400 plants — philodendrons, ivies and ferns — into holes they cut in the felt.
A trough they installed along the floor collects runoff water from the irrigation system, and a pump with a filtration sponge sends it back up the wall. Timers control the watering, which happens four times a day.
The design, which they devised with the help of a horticulturalist friend, was based on Mr. Blanc’s system and on research they had done online. The total cost was $3,000, but the result was worth it, Mr. McGregor-Mento said. Most people who visit want a green wall of their own, and the effort involved wasn’t that onerous: “Building a vertical wall is about as difficult as painting a room.”
Friday, April 16, 2010
Carlos' Beautiful Wall
Carlos wrote to me to share his making of video and to thank me for the info on this site. He wrote:
"Hi Matt
I want to congratulate by continue to share with us your garden and your experience. I also want show you the garden I made with a part of your information. Thanks.
http://www.youtube.com/watch?v=env-ABKx658
A great greetings from Mexico
Carlos Pacheco"
This makes me so happy! The whole point of this site is to show people that if they want a greenwall they can make it themselves. Carlos' wall is beautiful. I especially like the use of the white felt. It makes it look as if the plants are just growing right out of the wall. Also it's great to see that Carlos used emitters and he plumbed his system. Very smart. I'm still carrying 5 gallon buckets to my wall every few days. Also the long hanging plants really help to break up the texture of the wall. It will be interesting to see photos of the wall as it fills in too. Our wall was planted so densely that it really hasn't changed much but Carlos' wall will definitely grow in a bit. Can't wait to see it. Congratulations Carlos. Hopefully Carlos will be interested in writing a description of the making of his wall. I publish it here if he is.
Matt
Wednesday, March 24, 2010
Irrigation Hole Size
Just a quick note about hole size in irrigation tube. The holes in my tube are almost exactly the same size as a paper clip. I think I wrongly stated in a previous post that they were the size of a pencil lead. Not a huge difference but a difference none the less. Also Blanc mentions the size in millimeters in his description from Dwell which I reposted in an earlier post.
Matt
Matt
Sunday, March 7, 2010
Office Greenwall Canceled
Sorry to all the volunteers but my office greenwall isn't going to happen because I no longer work for that company. The next greenwall I build will be fully documented so stay tuned.
Matt
Matt
Saturday, January 30, 2010
Katie's Questions About Irrigation
Hi Matt,
I've been checking out your green wall blog for quite some time preparing to build my own green wall. I really like the Patrick Blanc style wall system in your I was wondering if you could give me more specs about the irrigation you used. I saw you said it was rubber hose, which would work for me as I'm trying to keep my costs down... could you tell me more? Also, any other info you may have would be fantastic. Thanks!
Katie
Hi Katie,
The tubing I used was PVC tubing. As I have mentioned before I wouldn't use PVC again because it is a toxic plastic although it is quite common. I would substitute an inert plastic like polyethylene. Something like this.
http://www.amazon.com/Polyethylene-Tubing-Wall-Working-Pressure/dp/B000FN10CO
I used a pump similar to this one.
http://www.garden-pond-supplies.com/Pondmaster_Magnetic_Drive_Pond_Pump_MD_12_p/02712.htm
You'll need adapters to connect all your tubing to your pump. Depending on what setup you chose you'll need a few L connectors and possibly a T connector. Also you'll need to step down sizes if you use thicker tubing for the vertical. Read on for an explanation.
Ideally your pump sits at one corner of your basin and pumps water up to the top of the wall where it pumps across the wall and trickles down. That would make an L shape if you were looking at the tubing on the wall. You could also locate the pump in the middle of the wall and split the tubing to either side. This would form a T. The advantage of the T shape over the L is that you could balance pressure a bit better. In the L shape the holes closer to the pump get more pressure and thus more water. The further you get from the pump the less pressure and the less water. If you use emitters
http://www.dripirrigation.com/index.php?cPath=38&sort=2a&page=3
...then the flow can be balanced by the emitter. I didn't use emitters and I don't know much about them. I just know that they can balance flow. For my wall I just drilled holes in the tubing and used very low pressure. I also slope the tube down slightly at the end to use gravity to even out the pressure. Setting up the water pressure is one of the trickier parts in a greenwall.
I have mentioned before that I could probably have used a smaller pump that cost less but how much smaller I'm not really sure. The aquarium store that sold me the pump said I could return it if it was the wrong one. You may want to find a store willing to do this. Also be careful about recommendations from the aquarium store. They require much more pressure in their lines then a greenwall does. For that reason they recommended a pump that was larger than I really needed. If you use emitters you'll need more pressure. The irrigation store you get the emitters from can make a recommendation I'm sure.
The aquarium store did recommend a much thicker pipe for the vertical tube. I'd say the tube was about 1.5 inches ID (interior diameter). The idea is that pushing the water up to the top of the wall requires the most force so you want a wide tube to increase the flow and lessen the pressure. I followed their instructions but I am not completely sure it was necessary.
I drilled holes on both sides of my tubing (front and back) with holes every 4 inches as described by Patrick Blanc. In future I would only locate the holes facing backwards (towards the wall) because at times forward facing holes have led to drips off leaves.
Blanc describes the irrigation holes as being 2mm. I'm not sure if I converted that to figure out the right drill bit size. It was to my memory about the size of a pencil lead. Maybe a bit smaller.
Your pump will come with some kind of filter sponge and I highly recommend you use it. It doesn't take much to clog the small holes. Be very careful when you plant your wall to get as little soil/debris in your basin as possible. If possible install the basin after you plant your wall.You may want to consider some kind of inline filter as a back-up. The filter on my pump came off once and I had to take the tubing down and clean the holes out by hand.
I use a digital 7 day timer to water my wall. This is the timer I use.
http://www.intermatic.com/products/timers/consumer%20outdoor%20timers/digital%20timers/hb88rc.aspx
This timer is easy to program and you can set multiple very short intervals as many times a day as you like. Although it's a seven day timer I have it set to water the same times everyday. So you could probably use a digital one day timer too. I water 4x a day for 10 minutes.
I'm not sure how soon you plan to build your wall but if you can wait about a month I will have my fully documented wall build online. If you have any other questions please let me know.
Matt
Tuesday, January 26, 2010
Denis' unique greenwall lamp
Denis has been emailing back and forth with me for awhile so it was great to receive these photos. I asked Denis to include a description too. Here goes.


In foundation plastic cachepots.
Post from polycarbonate sheets 6 mm. http://www.polygal.com/htmls/subject.aspx?c0=12012&bsp=12348
Material ssm45 http://www.hydrotechusa.com/product_data/moisture%20mat%20ssm45_pds.pdf
Watering tubes ftom metalloplastic pump for a fountain.
A lamp-shad is home-made.
Contacts it is possible will include without problems.
Denis
D&M studio тел.(495)968-7259 mailto:dimstudio@yandex.ru
(495)969-5915
www.dimstudio.ru
www.dimflora.com
Thursday, December 10, 2009
My very first post about greenwalls (January 13, 2008) before I even had one
Here's an old post I made on Tribe. It details my early thoughts and info on greenwalls before I'd actually made one.
Some of this info is WRONG! The Girbaud wall probably didn't have thin tubes at intervals (Blanc spreads his tubes out by at least 8-10 feet) and the backing for the Phyto wall was probably much thinner than I estimated. More like 1/3 of an inch than 3/4 of an inch.
Re: Looking for marterials to make a Living Plant Wall
Sun, January 13, 2008 - 6:20 AM
Hi,
I'm interested in making a planted wall too. Here's some info. Dwell issue Nov 2006 (page 144) has an article on Patrick Blanc. In it he describes a simple "recipe" for the wall.
"10mm thick waterproof PVC slabs covered with polyamid felt, into which holes (pockets actually) are cut for plants; a small hose, punctured every 10cm by a 2mm hole, to run the length of the top of the wall; a timing device to ensure regular, light watering- like a trickle slowly wending its way down a mossy rock. The ensemble is then attached to a metal structure that stands out from a supporting wall, trapping a cushion of air, which acts as insulation."
In addition to this info there is also a plant map of one of his walls which is really what you need to understand what he's planting where.
I live in New York city and there are currently two walls that I am aware of here. One in the Girbaud store and one here:
www.interiordesign.net/index.asp
I have visited both walls (the phyto wall just yesterday) and have been able to gather a bit more info. There appear to be two layers of felt stapled to each other. The outer layer is cut to create a pocket for the roots. Contrary to what I assumed there is some soil around the roots in the pocket. However to avoid insects etc. I think it's probably wise to remove all potted soil and replace with steralized soil unless you are certain your plants are planted in safe soil. Although being a fishtank keeper part of me would argue that insects and whatever else is in the soil mass probably would contribute to the health of the wall. There is also a drip catch at the bottom of the wall. You might also want to see the TV show "21st Century Garden Art The Planthunter Patrick Blanc". I found it on Azureus "Vuze" for 99cents to rent and 1.99 to buy. In in Blanc talks about there being different climates on the wall. The bottom being shaded and wetter and the top being lighter and dryer. This is one of the keys I believe to success. You need to plant the right plants in each area or plant very forgiving plants that do well in quite a range. You might also want to contact Laurent Corradi. He maintained the Phyto wall. He's located at plantwalldesign.com. The polyamid felt is a common carpet liner and should be easy to come by. Also I have yet to see any real mold growing on a Blanc wall and I think this is due in part to the use of the polyamid. You need synthetics otherwise you are asking for trouble. On the phyto wall there was a thick plastic sheet about 3/4 thick. On to that was stapled what looked like a synthetic black burlap and on top of that was the felt. On the Girbaud wall it seemed as if there were many fine irrigation hoses running at intervals horizontally across the wall but I could have been mistaken. In the coming weeks I'll be getting more info so stay tuned and good luck.
Matt
Wednesday, December 9, 2009
PingMag Patrick Blanc Interview

Click for PingMag Patrick Blanc Interview.
"The Vertical Garden is composed of three parts: a metal frame, a PVC layer and felt. The metal frame is hung on a wall or can be self-standing. It provides an air layer acting as a very efficient thermic and phonic isolation system. A 1cm thick PVC sheet is then riveted on the metal frame. This layer brings rigidity to the whole structure and makes it waterproof. After that comes a felt layer made of polyamide that is stapled on the PVC. This felt is corrosion-resistant and its high capillarity allows a homogeneous water distribution. The roots are now growing on this felt.
Watering is provided from the top with the tap water being supplemented with nutrients. The process of watering and fertilisation is automated. The whole weight of the ‘Vertical Garden’, including plants and metal frame, is lower than 30 kg per square meter. Thus the Vertical Garden can be implemented on any wall without any size or limitation of height."
One I don't think I've read before.
Enjoy.
Matt
Nori's Awesome Wall
It's great when people invent their own ways of doing things. Nori has come up with her own approach to a greenwall system; no soil, carpet padding for felt, fishtank reservoir. I love it! Here's her system in her own words and a link to her blog with lots more info.

Matt, I have a vertical garden that isn't quite what you have described. Mine uses a single layer of nylon felt stapled to a backer board with the plantings using little to no dirt. Here's the first page of posts (lots of pics). Read through to the end for the complete tale.
I am using a single layer of nylon carpeting padding felt (well rinsed before use). The majority of the soil was removed from the planted starts. Anything I had started in water was tucked into a pocket sans soil. Seeds were pressed into pinches of peat moss in tiny pockets.
My wall is fed from a 30 gallon aquarium with two small goldies and a pleco. I started using a 3 gallon bucket with water from one of our outdoor fish tanks. I add a small amount of potash(? - going from memory here . . . ) monthly. I top up the aquarium monthly so combine these tasks. I feed the fish every morning and have the aquarium filter set at 85.
So far my wall is doing awesomely well. I planted it in April. The geranium and begonia have bloomed. I'm holding out hope for the vining black eyed susan and coleus but will probably have to wait for spring.
I am planning a larger plant wall to go on the north wall of our sun porch (glass roof so won't be using the shade loving house plants in this wall). I was able to get some LDPE sheets destined for recycle from a local printer. They're about 3/8" thick and about 3'x4'. I'll screw them to a framework, sealing the seams and staple on my felt.
I like this felt. It feels dry except when the pump is running water through it. It may be best to use 2 layers of felt, but so far the wall is awesome with a single sheet.
Nori
elf at elfnori dot com
Sunday, December 6, 2009
Great Greenwall Blog from Peter in Miami
http://verticalgardenmiami.blogspot.com/
Tons of videos and how to info. Great resource.
Matt
Tons of videos and how to info. Great resource.
Matt
Saturday, December 5, 2009
Added a Translator
While I don't get many visitors to this blog yet the ones I do get seem to be from all over the world. In order to make it easier for all of the non-english speakers I have added a Google translate tool to the page. Let me know if it helps you. Good luck to all the greenwall makers making our world a greener place.
Matt
Matt
Tina's Update
Here's the latest on Tina's wall. If anyone would like to contact Tina she can can be reached at tina at blondiestreehouse.com
Hi Matt,
I finally got to go to your blog- it’s fantastic! You are really making a difference in demystifying things for people. I so applaud you!
Here are some more photos.


I have adjusted the irrigation two more times. I will revisit tomorrow and see how things are going. Because our tube at the top is thinner I have been letting it run longer just twice a day. It has ended up being too wet still. So I have modified the 2nd watering to occur at night only 3 times a week. My maintenance person checked it today and said some parts were dry- but I was hoping for that a little because now I can start to find the perfect wet/dry correlation that will help the plant roots flourish (fingers crossed of course!). Some of the begonias (I used a very small handful of a rex variety) have already failed. They did not send me the exact variety I wanted, so I feel that if I was provided with the ‘nigra marga’ or ‘soli-mutata’ like I requested and have experience with we would have had a better chance at getting these to thrive. We are going to replace them with Maranta, which we had much success with in the rehabbed modular walls.
So far the detritus at the bottom of the pool has been a little bit of an issue for the client, so I purchased a submersible water pump that we will use to flush out the water once a month, thereby giving us a chance to mop up the bottom of the basin. I am thinking I will place a few larger river rocks in the basin to create a visual barrier to the soil. They will be easier to clean than a ton of tiny ones. On the smaller walls, the simple system seems to be the best- it really would have been overkill to put in a drain line…
Anyway- I’ll keep you posted as we go into further weeks and months!
Tina
Hi Matt,
I finally got to go to your blog- it’s fantastic! You are really making a difference in demystifying things for people. I so applaud you!
Here are some more photos.


I have adjusted the irrigation two more times. I will revisit tomorrow and see how things are going. Because our tube at the top is thinner I have been letting it run longer just twice a day. It has ended up being too wet still. So I have modified the 2nd watering to occur at night only 3 times a week. My maintenance person checked it today and said some parts were dry- but I was hoping for that a little because now I can start to find the perfect wet/dry correlation that will help the plant roots flourish (fingers crossed of course!). Some of the begonias (I used a very small handful of a rex variety) have already failed. They did not send me the exact variety I wanted, so I feel that if I was provided with the ‘nigra marga’ or ‘soli-mutata’ like I requested and have experience with we would have had a better chance at getting these to thrive. We are going to replace them with Maranta, which we had much success with in the rehabbed modular walls.
So far the detritus at the bottom of the pool has been a little bit of an issue for the client, so I purchased a submersible water pump that we will use to flush out the water once a month, thereby giving us a chance to mop up the bottom of the basin. I am thinking I will place a few larger river rocks in the basin to create a visual barrier to the soil. They will be easier to clean than a ton of tiny ones. On the smaller walls, the simple system seems to be the best- it really would have been overkill to put in a drain line…
Anyway- I’ll keep you posted as we go into further weeks and months!
Tina
Wednesday, December 2, 2009
Gavin's Questions
Hi Gavin,
Thanks for your questions.
Did you just have one horizontal tube going across the very top of the garden to water the whole thing, or multiple tubes?
Just one tube on my wall at the top. I'd say one tube for every 8-10 vertical feet although I never measured it on a Blanc wall.
Did you use that regular flexible tubing and poke small holes in it, or was it a soaker hose type thing, or was it one where you had those drip emitters coming out?
I used regular flexible clear hose I bought from my local hardware store and then drilled holes in it. At one point the filter on the pump slipped and sucked up rotting leaves that clogged all the holes. I had to take the tube down to clean the holes. It was sort of a pain. Emitters might have made that process easier. Also emitters can control flow which was an issue at first with my tube. I had to balance pressure and gravity.
And the last question.. when you cut those slits, did you staple the front piece of felt to the back piece of felt to form a pocket, then put the dirt in then plant? Or did you just cut the slit, and put the plant in without dirt?
Great question. I really need to shoot a photo sequence of this but for now here's the description. We cut the slits in the first layer of felt (only the first layer gets cut), took the plant out of the small plastic pot, stuffed it in the slit, and then stapled around it to form a tight little pocket (about 4-5 staples).
Please keep your questions coming.
Thanks,
Matt
Wednesday, November 25, 2009
The Missing Woven Fabric
I went to Paris a few months ago and visited some Blanc greenwalls in person. I noticed that Blanc sometimes uses plastic woven or perforated fabric in between and behind the layers of moisture retention fabric.
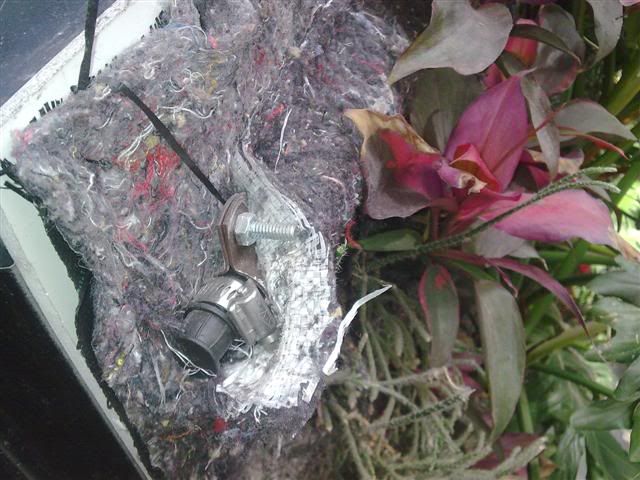
The black layer at the back and the white layer in the middle is the plastic. Image from theLushe blog.
As you can see the felt is separated by two layers of woven plastic fabric. This fabric is commonly used in landscaping. I assume this fabric helps with evaporation and adds to moisture retention. It would also give the roots a structure to hold on to besides the felt.
Here's an example of the fabric on a landscaping site.

I did not use this fabric when I made my wall because I was unaware of it. I can't say that it has effected anything. I suspect it's more crucial in an outdoor wall where evaporation might be more of an issue.
I also saw Blanc use a perforated polyethylene sheet in between the layers of felt on the musée du quai Branly wall. It was thin clear plastic that looked like it had been punched with a needle over and over again. On that wall the woven was used as the back most layer. It would seem Blanc uses the woven as the back layer on all his walls. He also mentions it in his original description in Dwell I believe.
Here's a simple diagram for the use of the fabric. I have seen Blanc locate the water source behind all layers although in the above picture it's between the felt layers.


The black layer at the back and the white layer in the middle is the plastic. Image from theLushe blog.
As you can see the felt is separated by two layers of woven plastic fabric. This fabric is commonly used in landscaping. I assume this fabric helps with evaporation and adds to moisture retention. It would also give the roots a structure to hold on to besides the felt.
Here's an example of the fabric on a landscaping site.

I did not use this fabric when I made my wall because I was unaware of it. I can't say that it has effected anything. I suspect it's more crucial in an outdoor wall where evaporation might be more of an issue.
I also saw Blanc use a perforated polyethylene sheet in between the layers of felt on the musée du quai Branly wall. It was thin clear plastic that looked like it had been punched with a needle over and over again. On that wall the woven was used as the back most layer. It would seem Blanc uses the woven as the back layer on all his walls. He also mentions it in his original description in Dwell I believe.
Here's a simple diagram for the use of the fabric. I have seen Blanc locate the water source behind all layers although in the above picture it's between the felt layers.

Tuesday, November 24, 2009
Super Secret Greenwall Plant List Revealed!
Venelin.Petkov said...
"Can you post a list of the plants you used and what nutrients are you using (I imagine you are not using pure water, since there are no minerals in the felt substrate). Thanks"
Llazar said...
"It would be great if could list the plants you used. Also, isn't there a problem of light? don't the plants need natural light in order to survive?"
People have asked me a few times now what plants I used and how I care for them. I'm happy to list what I can remember but honestly it doesn't matter as long as you match your plants to your wall. Each wall can be setup to provide varying amount of light, water, and nutrients. Patrick Blanc has used thousands of different types of plants on his walls. In theory almost any type of plant can work. I've even seen trees growing out of Blanc walls in Paris.
Each wall builder will need to decide how much light, water, and nutrients they want to provide. Here's a brief overview of my wall.
Light
I have pretty good light in the room but I decided to add some supplemental light from compact fluorescent bulbs. The lights aren't special "grow" lights. They are just regular bulbs. I think my wall would survive with out the additional light but the light helps the plants grow and makes the wall look nicer. Powerful artificial grow lights are available if you want to grow high light demanding plants.
Water
I water my wall 4x a day for 10 minutes a day (by drip tube on a timer). I had difficulty with the ferns on my wall drying out and dying at first. Originally I was watering 3x a day for a shorter period of time. I added a 4th time and increased the watering time to help the ferns. With the increase in water I saw an overall increase in growth from all the plants. If I had plants that needed even more water I'd make a larger basin and increase the frequency and amount of water.
Nutrients
I added fertilizer to my wall once in the time I have had it (just because a friend gave me some to try). I don't see the need to add more. We tend to trim our wall back when it grows out so more growth isn't required. We get new growth all the time so clearly the plants are getting what they need. Keep in mind that there is soil around the root ball of each plant. Also as the water trickles down the wall it picks up nutrients from the soil in each plant. At this point I wouldn't add more nutrients because my plants don't seem to need them. There are a variety of fertilizers on the market to suit just about any plant's needs.
Work with your local plant dealer to determine the plants that are right for your wall. Remember that on a small wall all the plants are in basically in the same environment so plants with different needs may die off. Also some plants cannot grow together. This can be determined from trial and error. Plant a range of plants with similar needs and see what does well. It's easy to add and remove plants from the little felt pockets.
Here's a partial list of plants I have on my wall listed in order of quantity.
Philodendron (35%)
Philodendron scandens “Green”
http://www.exoticangel.com/Varieties/ShowProductDetails.aspx?productid=210


Pothos (35%)

Epipremnum aureum “Marble Queen”
http://www.exoticangel.com/Varieties/ShowProductDetails.aspx?productid=224

Fern (15%)
Nephrolepsis exaltata “” http://www.exoticangel.com/Varieties/ShowProductDetails.aspx?productid=68

Adiantum pubescens “Maiden Hair Fern”
http://www.exoticangel.com/Varieties/ShowProductDetails.aspx?productid=73

Asplenium nidus “Bird’s Nest Fern”
http://www.exoticangel.com/Varieties/ShowProductDetails.aspx?productid=64

Nephrolepsis cordifolia “Lemon Button Fern”
http://www.exoticangel.com/Varieties/ShowProductDetails.aspx?productid=71

Nephthytis (10%)
Syngonium podophyllum “Various”
http://www.exoticangel.com/Varieties/ShowProductDetails.aspx?productid=320
http://www.exoticangel.com/Varieties/ShowProductDetails.aspx?productid=188

Ivy (5%)
Hedera helix “Various”
http://www.exoticangel.com/Varieties/ShowProductDetails.aspx?productid=133
http://www.exoticangel.com/Varieties/ShowProductDetails.aspx?productid=144
http://www.exoticangel.com/Varieties/ShowProductDetails.aspx?productid=168
"Can you post a list of the plants you used and what nutrients are you using (I imagine you are not using pure water, since there are no minerals in the felt substrate). Thanks"
Llazar said...
"It would be great if could list the plants you used. Also, isn't there a problem of light? don't the plants need natural light in order to survive?"
People have asked me a few times now what plants I used and how I care for them. I'm happy to list what I can remember but honestly it doesn't matter as long as you match your plants to your wall. Each wall can be setup to provide varying amount of light, water, and nutrients. Patrick Blanc has used thousands of different types of plants on his walls. In theory almost any type of plant can work. I've even seen trees growing out of Blanc walls in Paris.
Each wall builder will need to decide how much light, water, and nutrients they want to provide. Here's a brief overview of my wall.
Light
I have pretty good light in the room but I decided to add some supplemental light from compact fluorescent bulbs. The lights aren't special "grow" lights. They are just regular bulbs. I think my wall would survive with out the additional light but the light helps the plants grow and makes the wall look nicer. Powerful artificial grow lights are available if you want to grow high light demanding plants.
Water
I water my wall 4x a day for 10 minutes a day (by drip tube on a timer). I had difficulty with the ferns on my wall drying out and dying at first. Originally I was watering 3x a day for a shorter period of time. I added a 4th time and increased the watering time to help the ferns. With the increase in water I saw an overall increase in growth from all the plants. If I had plants that needed even more water I'd make a larger basin and increase the frequency and amount of water.
Nutrients
I added fertilizer to my wall once in the time I have had it (just because a friend gave me some to try). I don't see the need to add more. We tend to trim our wall back when it grows out so more growth isn't required. We get new growth all the time so clearly the plants are getting what they need. Keep in mind that there is soil around the root ball of each plant. Also as the water trickles down the wall it picks up nutrients from the soil in each plant. At this point I wouldn't add more nutrients because my plants don't seem to need them. There are a variety of fertilizers on the market to suit just about any plant's needs.
Work with your local plant dealer to determine the plants that are right for your wall. Remember that on a small wall all the plants are in basically in the same environment so plants with different needs may die off. Also some plants cannot grow together. This can be determined from trial and error. Plant a range of plants with similar needs and see what does well. It's easy to add and remove plants from the little felt pockets.
Here's a partial list of plants I have on my wall listed in order of quantity.
Philodendron (35%)
Philodendron scandens “Green”
http://www.exoticangel.com/Varieties/ShowProductDetails.aspx?productid=210


Pothos (35%)

Epipremnum aureum “Marble Queen”
http://www.exoticangel.com/Varieties/ShowProductDetails.aspx?productid=224
Fern (15%)
Nephrolepsis exaltata “” http://www.exoticangel.com/Varieties/ShowProductDetails.aspx?productid=68

Adiantum pubescens “Maiden Hair Fern”
http://www.exoticangel.com/Varieties/ShowProductDetails.aspx?productid=73
Asplenium nidus “Bird’s Nest Fern”
http://www.exoticangel.com/Varieties/ShowProductDetails.aspx?productid=64

Nephrolepsis cordifolia “Lemon Button Fern”
http://www.exoticangel.com/Varieties/ShowProductDetails.aspx?productid=71
Nephthytis (10%)
Syngonium podophyllum “Various”
http://www.exoticangel.com/Varieties/ShowProductDetails.aspx?productid=320
http://www.exoticangel.com/Varieties/ShowProductDetails.aspx?productid=188
Ivy (5%)
Hedera helix “Various”
http://www.exoticangel.com/Varieties/ShowProductDetails.aspx?productid=133
http://www.exoticangel.com/Varieties/ShowProductDetails.aspx?productid=144
http://www.exoticangel.com/Varieties/ShowProductDetails.aspx?productid=168
Sunday, November 22, 2009
Call for Walls
If you've made a wall please send me pics so I can post them here. If you are about to make a wall please document the process and send me a link to a video or a bunch of pics to post. I'd love to hear about the challenges and solutions of your particular wall. Got a wall nearby that you love? Take some pics and I'll post them and link to the location of the wall so that others can see it too.
New Patrick Blanc Interview Video
Well it's new to me at least. Nice shots of plants being put in the wall. You really see just how simple the little pockets for each plant are. Enjoy.
Three New Greenwalls!
I've got three new walls to talk about for this post.
Wall #1
Made by my friend, and greenwall consultant, Tina Dituri this wall was just made in New York City. Tina and I have been swapping notes as this wall is fairly similar to mine. More pictures to come but here's a photo of the wall in progress.

Wall #2
This wall is posted on youtube by Peter Kastan in Miami as a response to my video. Peter and I have been corresponding and it's great to see his wall finished and looking great. This videos shows the last plant being planted and a bit of a mishap.
Wall #3
My wife just got back from a whirlwind European tour (London, Paris, and Milan) She was tipped off by a friend in London about this wall in the Anthropologie store. This wall uses a modular system not the Blanc system. I have heard these modular walls can be difficult to maintain. Please comment if you've had experience with the modular system.
View Larger Map


Keep your questions coming I'll do my best to answer them here.
Wall #1
Made by my friend, and greenwall consultant, Tina Dituri this wall was just made in New York City. Tina and I have been swapping notes as this wall is fairly similar to mine. More pictures to come but here's a photo of the wall in progress.

Wall #2
This wall is posted on youtube by Peter Kastan in Miami as a response to my video. Peter and I have been corresponding and it's great to see his wall finished and looking great. This videos shows the last plant being planted and a bit of a mishap.
Wall #3
My wife just got back from a whirlwind European tour (London, Paris, and Milan) She was tipped off by a friend in London about this wall in the Anthropologie store. This wall uses a modular system not the Blanc system. I have heard these modular walls can be difficult to maintain. Please comment if you've had experience with the modular system.
View Larger Map


Keep your questions coming I'll do my best to answer them here.
Abonneren op:
Reacties (Atom)
